
Overview
This section is a duplicate of the overview of the prior blog post, but it is being provided here again for the sake of completeness.
HotCakeX has created a pair of open-source tools collectively known as Harden Windows Security.
https://github.com/HotCakeX/Harden-Windows-Security
The two components are:
-
Harden System Security (The focus of the prior blog post)
-
AppControl Manager (The focus of this blog post)
The above links are Microsoft Store links, which makes each component installable with a click. The GitHub link above is for providing further documentation and also the ability to analyze the source code.
Supported operating systems include:
-
Windows 11 25H2
-
Windows 11 24H2
-
Windows 11 23H2
-
Windows 11 22H2
-
Windows Server 2025
Harden System Security should be the least intrusive change, so this should be performed first.
AppControl Manager is the holy grail of Windows Security, in that it ends up with an allow list of what can run on Windows. So an arbitrary / malicious program will simply be blocked from executing on a system. This sort of configuration is arguably more secure than a stock Windows system with the best AV / EDR platform available installed on it. But it requires a bit of planning and testing, so this step should be performed only after you are comfortable with the system’s behavior after running Harden System Security.
In choosing which path(s) to take, take a moment to decide how secure you’d like your Windows system to be:
-
I don’t want Windows to be secure: Take neither path.
-
I want Windows to block some exploits: Use Harden System Security with a “Recommended” baseline.
-
I want Windows to allow exploits, but I don’t want it to run malware: Interesting choice, but use AppControl Manager to deploy a signed policy.
-
I want Windows to block some exploits and not run malware: Use Harden System Security with a “Recommended” baseline and use AppControl Manager to deploy a signed policy.
This final option will result in a Windows system that is by design more secure than any stock Windows system that simply has signature-based AV products and/or EDR software installed on it.
Here is a simplified flowchart with your options. The least secure option is at the top, with each end stage having increased security as you go down. The Done step at the very bottom is the ideal recommended hardening stage.
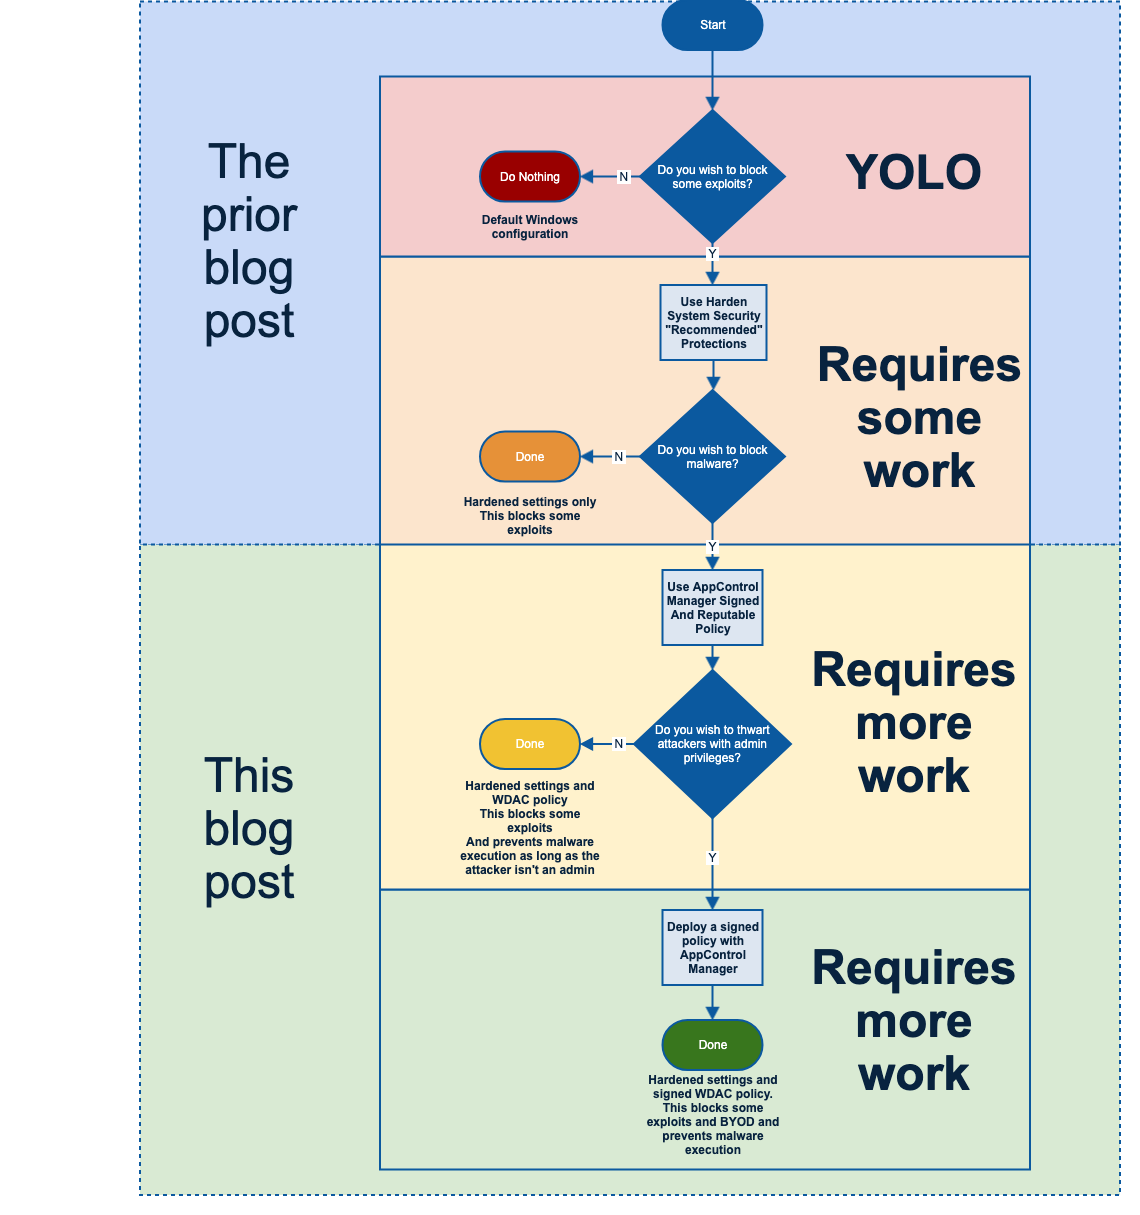
The bottom section here is the goal, as it blocks some exploits, prevents malware execution, and blocks all BYOD attacks, or “BYOVD” as is currently (yet incorrectly) used to describe this type of attack.
Back up your system / clone your system to a VM for testing
Hardening your system can have unexpected consequences. Given the vast amount of software out there, you might have a special snowflake of a system that may catastrophically fail to boot when hardened or have app control enabled. So let’s create a VM of your system so that we can try before we buy.
Back your system up
Ideally you already have an active and verified bare-metal backup and restore process in place. If not, you might have some soul searching to do about your relationship with computers. Nonetheless, here are some backup options:
Free
-
Acronis True Image for Western Digital (Must have a Western Digital hard drive)
Trial
All of these tools have the ability to:
-
Create a live image of Windows while it is running
-
Create a bootable rescue media ISO
-
Boot from this rescue media to restore a backup to a clean VM, even from a NAS share
Create a backup of your system onto a USB 3 USB device or a NAS or to some other device that you are comfortable that your rescue media will be able to access.
Restore to a VM
To increase the chances of the VM booting properly, try to make the VM’s hardware as close to your real hardware. For example, if your real hardware has a NVMe, then make your VM also have an NVMe of equal size for storage. If your VM properties are different enough from your real hardware, Windows may require special retooling to ensure that it boots on the new hardware. The steps to restore your machine to a VM are:
-
Create a rescue media ISO using the backup software that you have selected.
-
Boot your blank VM using the rescue media ISO.
-
Restore your VM using the rescue media. If you backed up to a network share / NAS, then browse to the location of the backup. If you backed up to a USB storage device, ensure that your VM has USB 3 support and connect this device so that you can browse to your backup.
If all goes well, you’ll have a VM of the machine that you are using, where you can test any scenario out before deploying it to your bare metal system. Use your virtualization software’s snapshot capabilities to have a clean state that you can restore to in case of catastrophe.
Even if you don’t go down the path of creating a VM of the system that you plan to lock down, you’ll at least want to have a full-system backup before proceeding with anything.
AppControl Manager
Harden System Security is a great all-purpose set of mitigations, so congratulations for making it this far. But if we want true protection for Windows, we need to use App Control (WDAC). While a completely hardened Windows system will block some exploits, it will still happily run malware.exe if the user clicks on it. We can protect against this sort of thing from happening with AppControl Manager, which is a Microsoft-approved tool for managing and deploying application control policies.
Note that Windows 11 Home editions do not have the ability to manage WDAC policies, and as such will be unable to use AppControl Manager.
Create and deploy policy
In AppControl Manager running with admin privileges, browse to the Create Policy section at the top of the left pane. If AppControl Manager is executed without privileges, the options to deploy policies will be disabled. Here we want to Create Signed And Reputable Policy. The reason for this choice is that it is the least painful way of configuring an App Control policy. While Default Windows and Allow Microsoft policies are more secure, they’ll also block popular and legitimate third-party software.
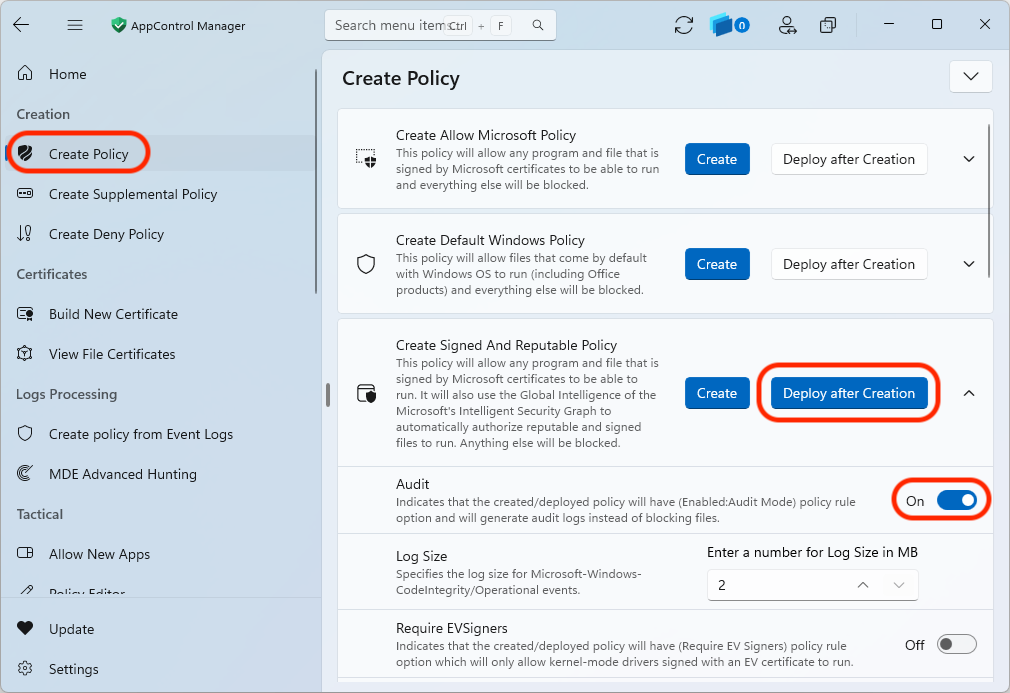
In Create Policy, we want to:
-
Click the
Deploy after Creationtoggle button to enable it so that we don’t need to perform the step of manually deploying the policy after creating the rule. -
Click the drop-down arrow to the right of the
Deploy after Creationbutton to expand the options. -
Click the toggle in the
Auditsection at the top to turn itOn. This will allow us to observe what things would be blocked by the policy as we observe the consequences of the changes that were made. This is important, as if we did not do this, we might have apps unexpectedly be blocked or potentially even witness Windows fail to boot. -
Finally, click the
Createbutton to the left of theDeploy after Creationbutton that we activated in theCreate Signed and Reputable Policysection.
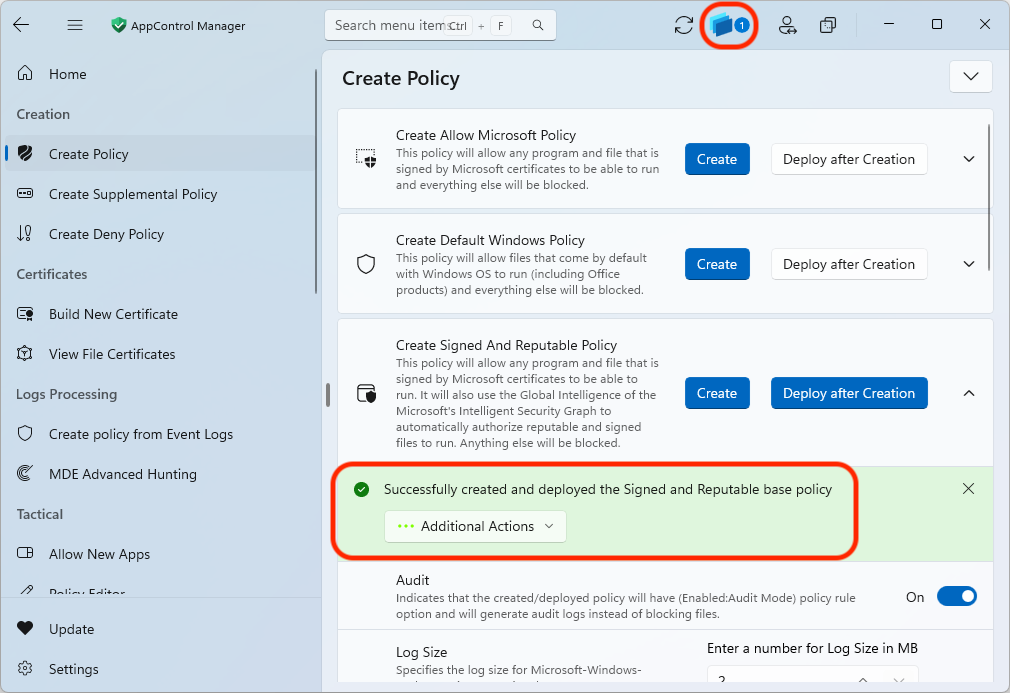
If all goes well, you’ll see an indication of success. Specifically, the policy count indicator at the top will go from 0 to 1 and there will be a green bar that indicates that the policy has successfully been created and deployed.
Troubleshooting quirks
Depending on how the system was originally configured before setting up a WDAC policy, some things may behave unexpectedly.
WDAC enabling previously inactive AppLocker policy
WDAC and AppLocker are close cousins in the Windows ecosystem. Close enough that the message displayed to the user can look the same to the end user. And also close enough that simply deploying a WDAC policy in Audit mode can cause a previously inactive AppLocker policy to suddenly become active. This is what happened in our case.
In the days of Windows 10 automatically installing foistware like Candy Crush Soda Saga onto endpoints, we had played around with an AppLocker policy to block such things. We quickly determined that the policy was worthless and moved on. However, this policy remained on our system, inactive.
The ironic thing about deploying a WDAC policy in Audit mode was that this very action caused our AppLocker policy to go to Enforce mode. The reason for this is that when enabling a WDAC policy, even in Audit mode, this switches Windows into a “modern application control mode”, which has the consequence of activating AppLocker policies that may be present but not active before. We noticed this when attempting to even run the Microsoft Store itself:
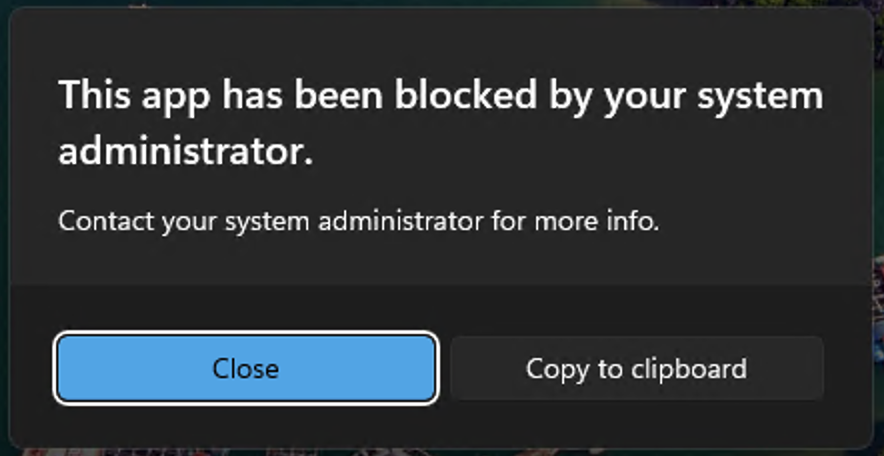
This blocking was not present anywhere in the WDAC CodeIntegrity section of Event Viewer. It was in the AppLocker part:
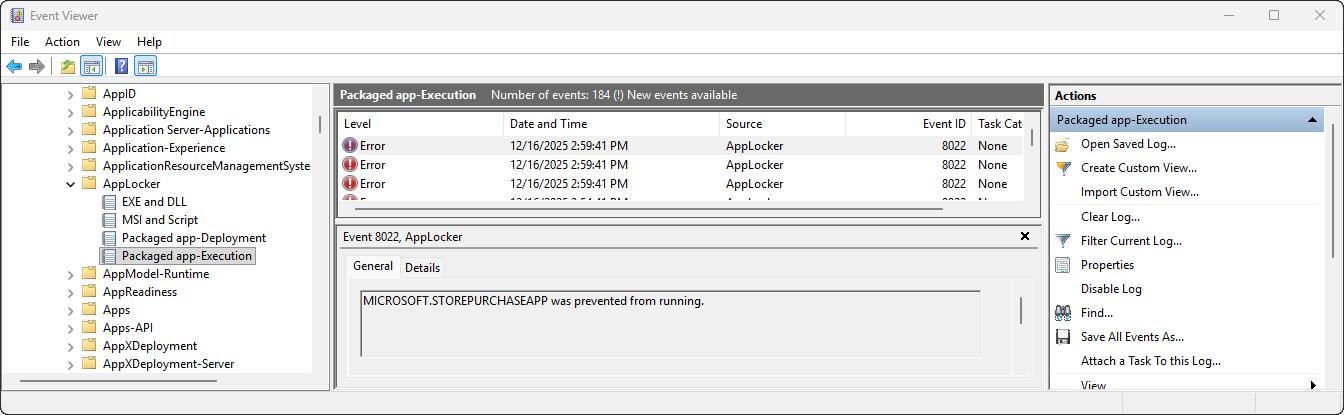
We can see the AppLocker policy in PowerShell:
Get-AppLockerPolicy -Effective | Select-Object -ExpandProperty RuleCollections

>>

PublisherConditions : {Microsoft.Windows.ContentDeliveryManager\CN=Microsoft Windows, O=Microsoft Corporation, L=Redmond, S=Washington, C=US\*,*}

PublisherExceptions : {}

PathExceptions : {}

HashExceptions : {}

Id : a1baec9b-3250-44fe-865d-41c9397dcfcd

Name : Microsoft.Windows.ContentDeliveryManager, from Microsoft Corporation

Description : Block foistware?

UserOrGroupSid : S-1-1-0

Action : Deny
Well there’s the smoking gun. The deny policy was something called Block foistware?
And indeed this was a policy that we created in the past and then abandoned because it didn’t seem to do anything.
We can run secpol.msc as admin and see our policy:
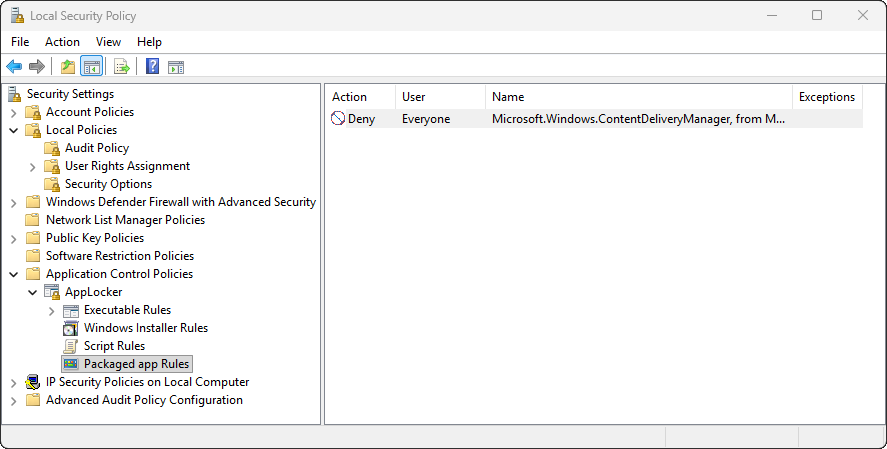
And its details:
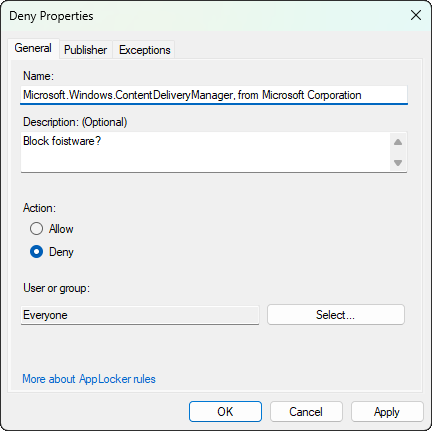
Now that we see this policy in action, we can clearly see that it’s too aggressive in what it blocks. In that it blocks all Microsoft Store apps, as well as the store itself.
To remove this unwanted blocking policy, simply delete it.
Note that this configuration is very unlikely to happen in the wild. Specifically, to have an AppLocker policy installed, but on a system where the AppIDSvc service isn’t running, and therefore not actually using the policy.
PowerShell switched to Constrained Language Mode on a system with WDAC active
On a stock Windows system, PowerShell executes in Full Language mode by default. This default allows full PowerShell functionality in scripts that it executes. However, it is also potentially dangerous when running untrusted PowerShell code.
However, even in Audit mode, a deployed WDAC policy will cause PowerShell to enter Constrained Language Mode. In this mode, unsigned/untrusted PowerShell scripts will be restricted in the actions that they can perform. The rationale for this change is that if WDAC is being used to control which programs can be run, allowing PowerShell that is not in Constrained Language Mode is equivalent to allowing everything.
If you’d prefer the less-secure option of not locking down PowerShell, be aware that this will be a gaping hole in your WDAC policy. If you do indeed need unconstrained PowerShell, first click the icon for the policy library, then click the policy you’d like to modify, and finally click Configure Rule Options.
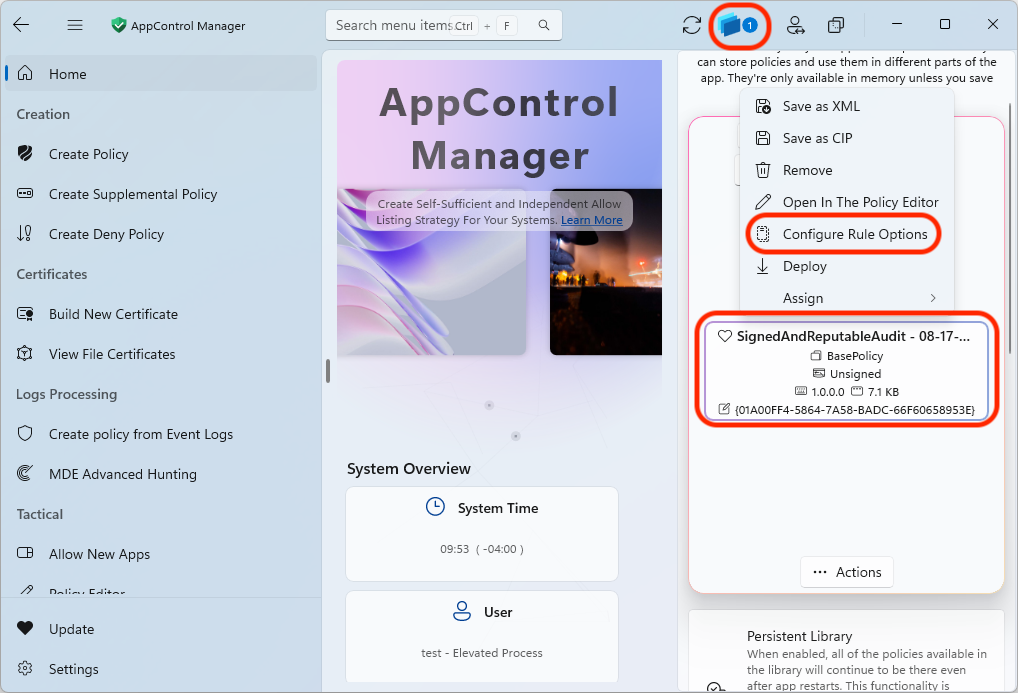
You can return PowerShell to the less secure stock Windows behavior by enabling the Disabled:Script Enforcement option.
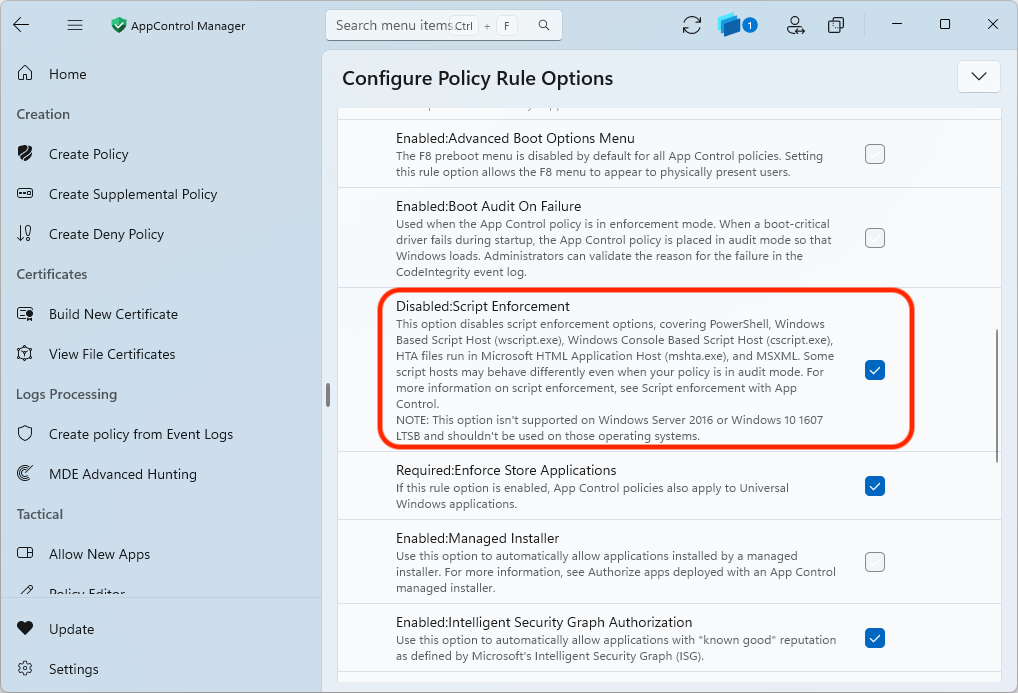
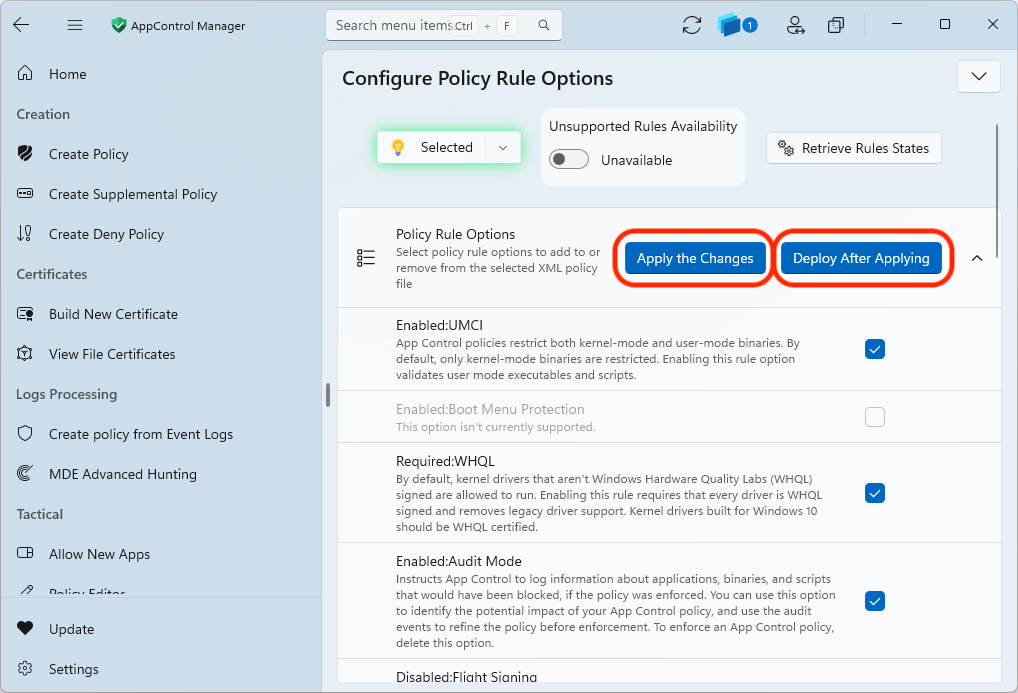
Once this feature has been enabled, click the Apply the Changes button at the top of the page, after ensuring that the Deploy After Applying button is enabled. Otherwise, manual deployment of the policy will be required.
If you are curious about the enabling of a Disabled option, be sure to read Raymond Chen’s Why do Group Policy settings require me to have a degree in philosophy?.
Tweak policy to add exceptions
When Windows is done booting and the dust has settled, the event logs will show the things that would have been blocked due to the WDAC policy.
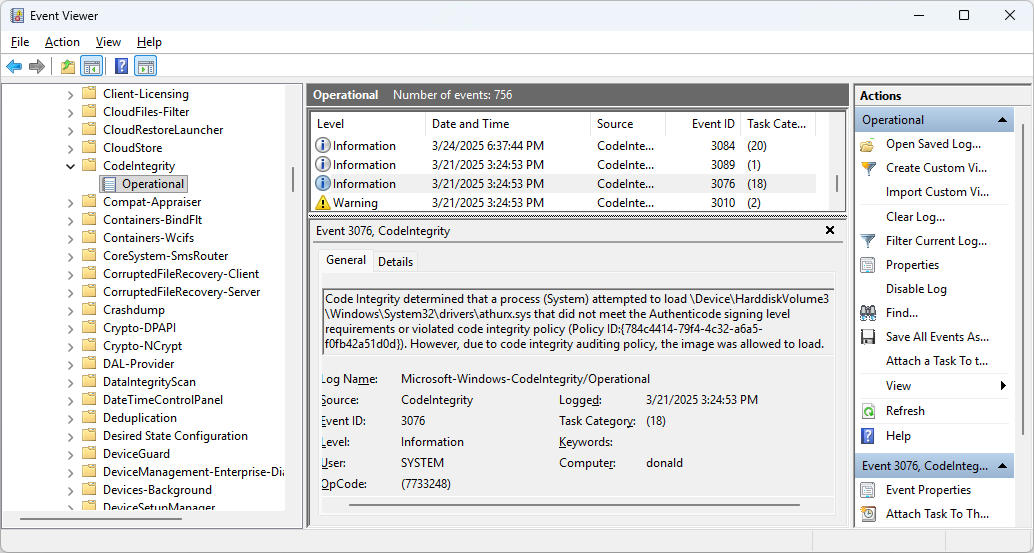
Here we can see that we have a 3076 event ID that states:
Code Integrity determined that a process (System) attempted to load
\Device\HarddiskVolume3\Windows\System32\drivers\athurx.sys that did not
meet the Authenticode signing level requirements or violated code
integrity policy (Policy ID:{784c4414-79f4-4c32-a6a5-f0fb42a51d0d}).
However, due to code integrity auditing policy, the image was allowed to
load.
We can simply sift through all of these events and come up with what we need to add to our WDAC policy to have it behave as before, right? Get real. Nobody wants to do any of this.
Create policy from Event Logs
In AppControl Manager, click the Create policy from Event Logs link on the left side, and click the Scan Event Logs button. This will display all of the things that would have been blocked by our policy, but were not actually blocked due to being in Audit mode.
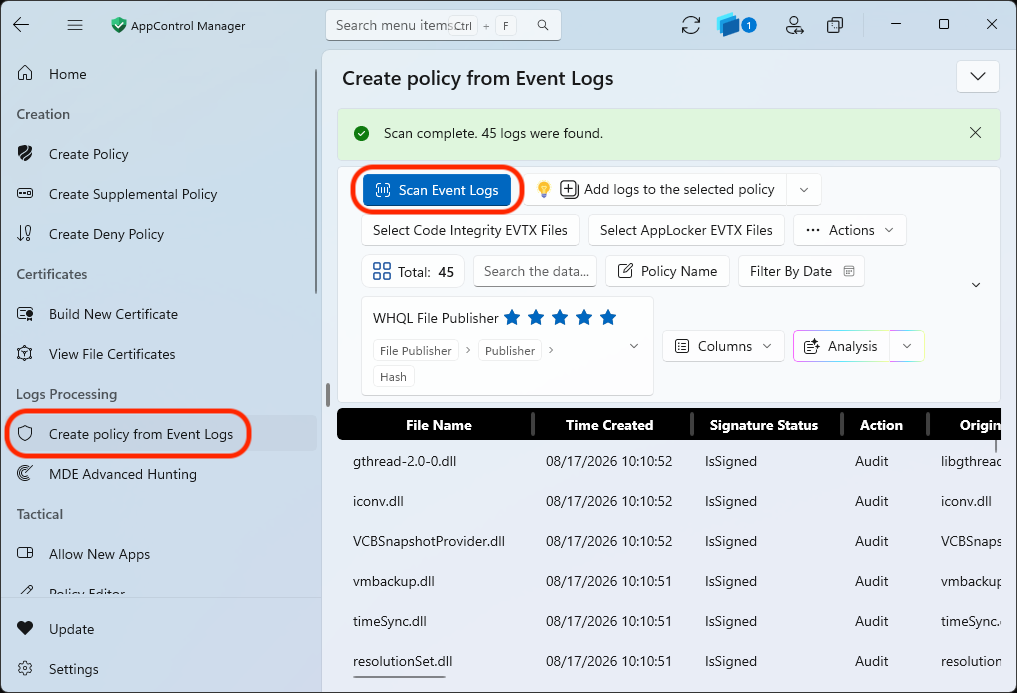
Once this list is populated, click the blue icon for the policy library at the top. At this point, the policy library sidebar will display. Here we click the name/details of our policy. In our case, it’s a policy called SignedAndReputableAudit, and it shows that it’s a base policy, unsigned, version 1.0.0, and it shows the GUID for the Policy ID. Click the Assign item and then Add To Policy.
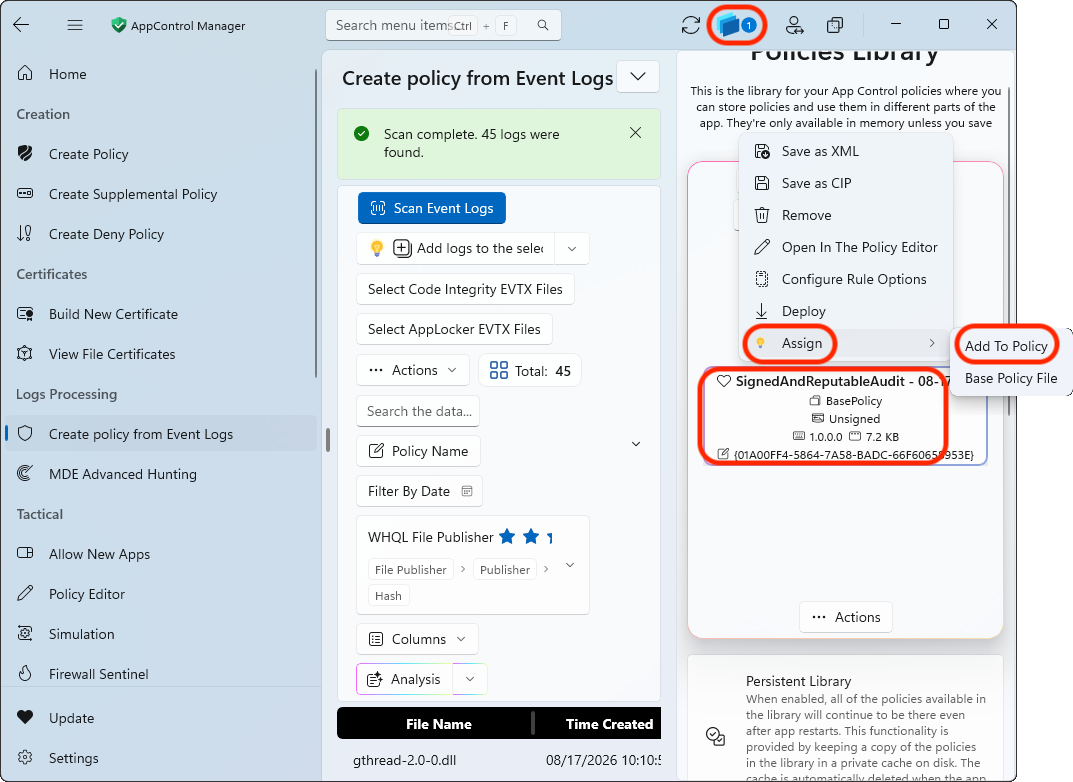
The reason for adding to an existing policy is our goal to have a single policy file for our system, as opposed to a base policy and additional policies for each time we reboot and notice changes we want to make.
After the policy to add to has been selected, click:
-
The drop-down next to
Actions -
Deploy after Creation -
Clear System Logs→Clear Code Integrity Logs -
Clear System Logs→Clear App Locker Logs
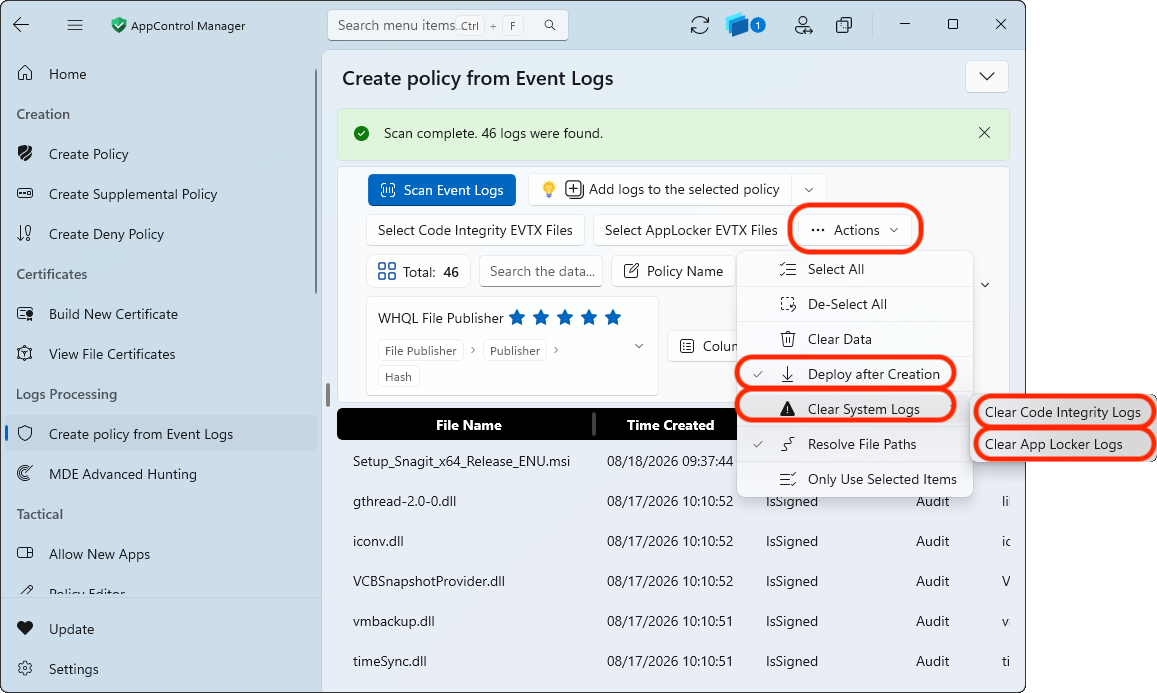
The reasons for settings these options are to deploy the policy immediately after it’s created, and also so that after we apply our policy, we have a clean slate for checking new exceptions after we reboot.
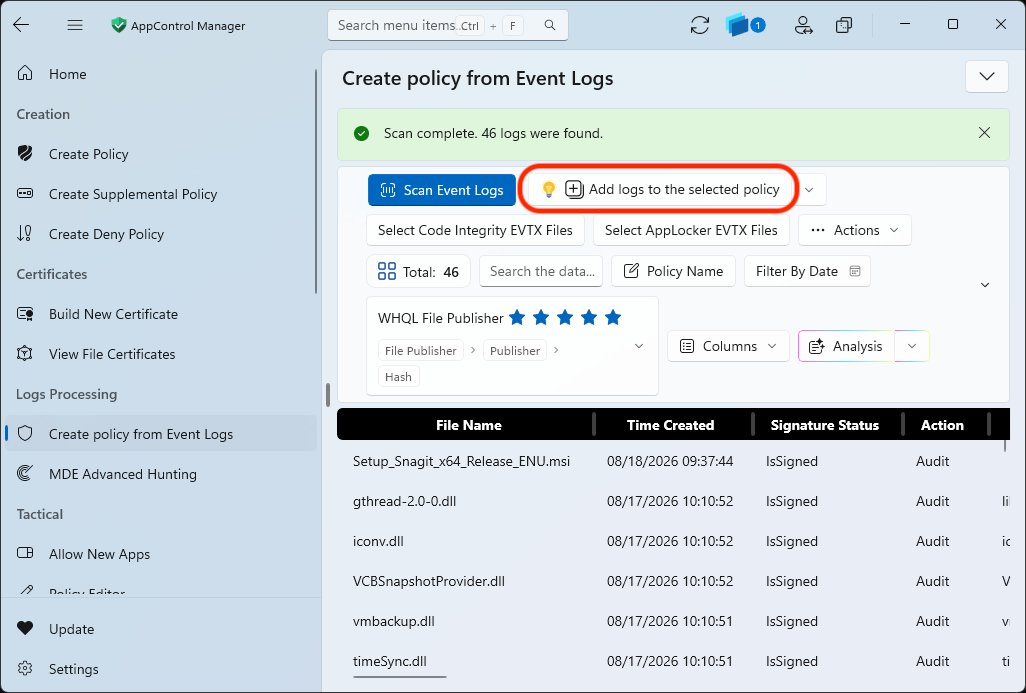
Click the Add logs to the selected policy button to merge the changes into our policy. Since we selected the Deploy after Creation option, this policy was deployed on our system after the merge occurred.
Reboot the system and go back to Create policy from Event Logs in AppControl Manager again. Click Scan Event Logs and observe the results. If all is clear, then you will see 0 logs were found at the top.
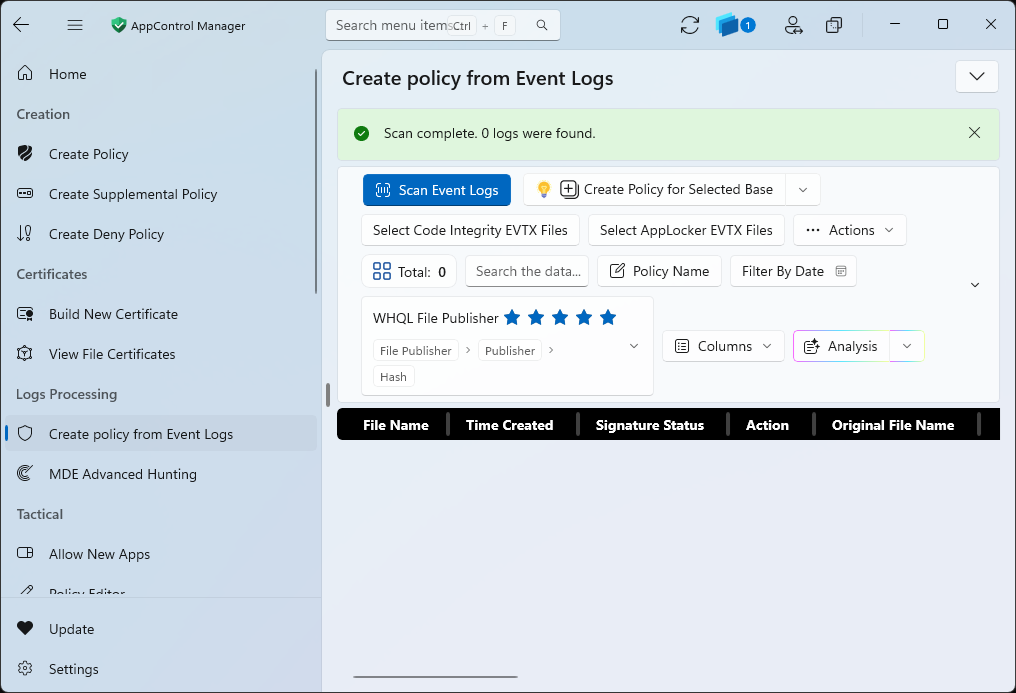
If newly detected exceptions are detected, simply perform the same sequence of steps as above to import the adjustments to your policy file.
At this point we have a modified Application control policy file that will allow our system to boot up with no violations. If we want to be more thorough, we can leave the system in Audit mode for a week. Through normal system usage, and also through waiting to allow some scheduled tasks to execute, we may possibly see more exceptions that we should add to our policy using the technique described above.
Adding directories for exceptions
While we have a base policy of Signed and Reputable that explicitly includes our exceptions encountered upon Windows booting, we need to get into the concept of a supplemental policy if we want to have broader (e.g. directory-based) exclusions. It is important to realize that adding a directory will not allow-list the directory, but rather that it will scan and allow the contents at the time of the policy modification.
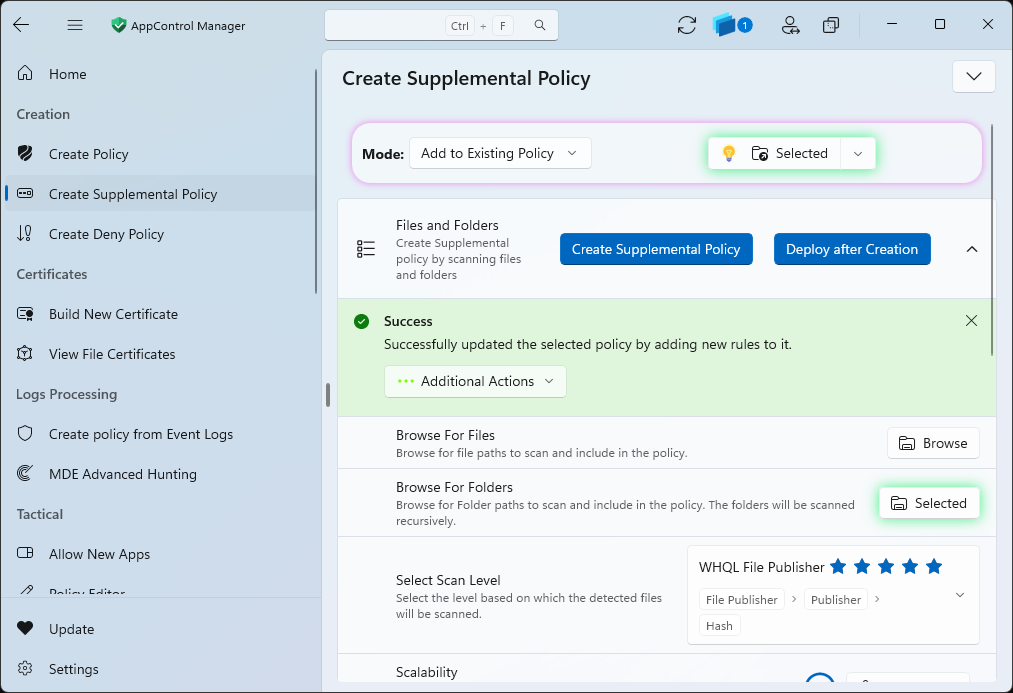
Despite the wording of it being a “supplemental” policy, we can continue to add our changes to our base “Signed and Reputable” policy. First click the Create Supplemental Policy link on the left side. Then click the Add to Existing Policy drop-down item and then click Add to Existing Policy to ensure that our changes get applied to our main policy, as opposed to creating a separate supplemental policy.
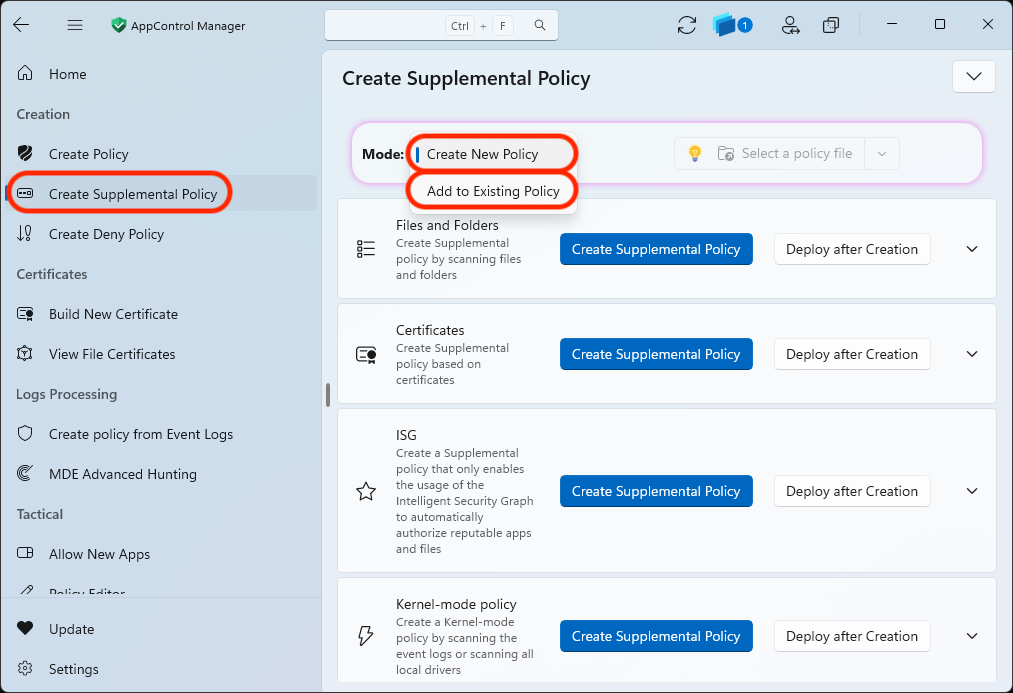
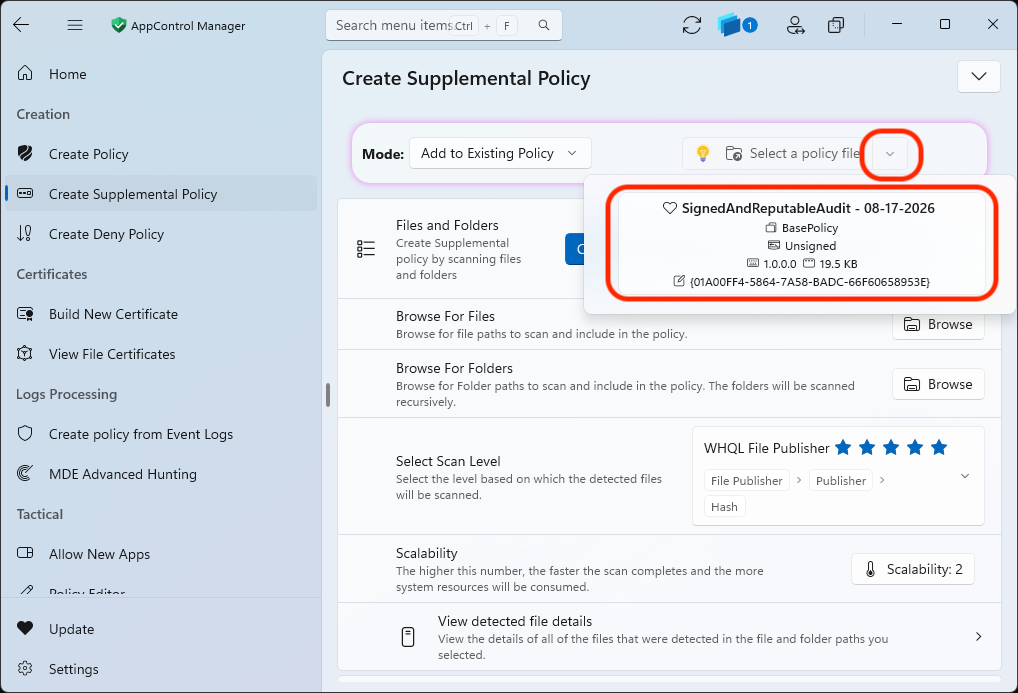
Click the drop-down arrow to the right of Select a policy file and select the main policy that we are working with.
Then in the Files and Folders section, click the Deploy after Creation button and click the drop-down arrow to the right of this button to expand the section. In the Browse For Folders section, click the Browse button.
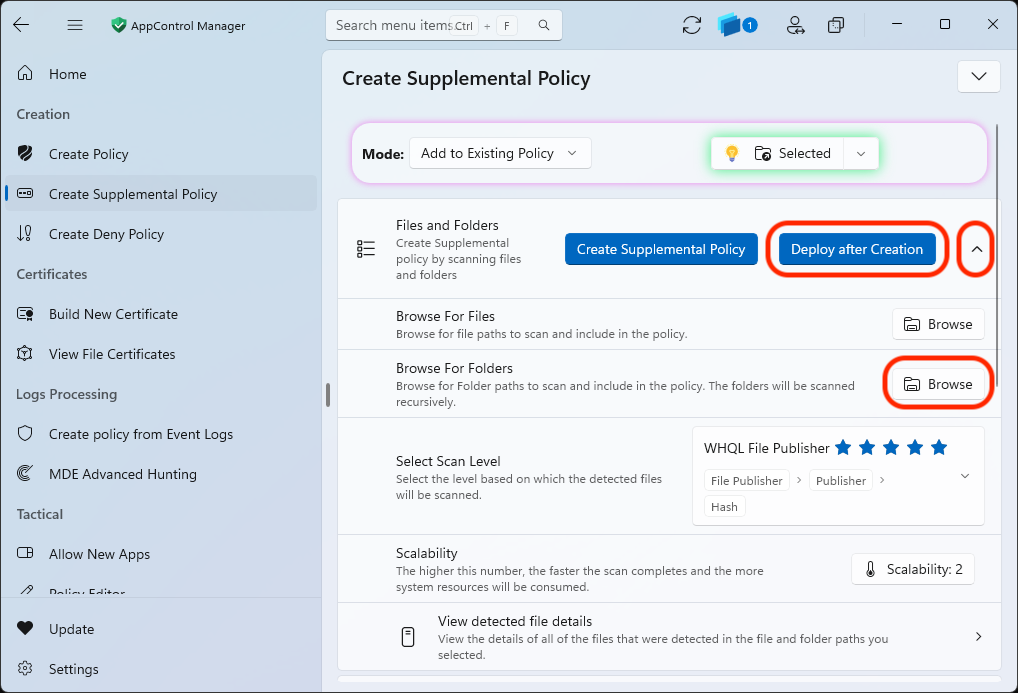
Finally, click the Browse button to select known-good directories that you’d like to allow. After this initial selection, you can click the Selected button multiple times to allow multiple directories in one policy change. Each time will add to the list of existing folders that you have already selected.
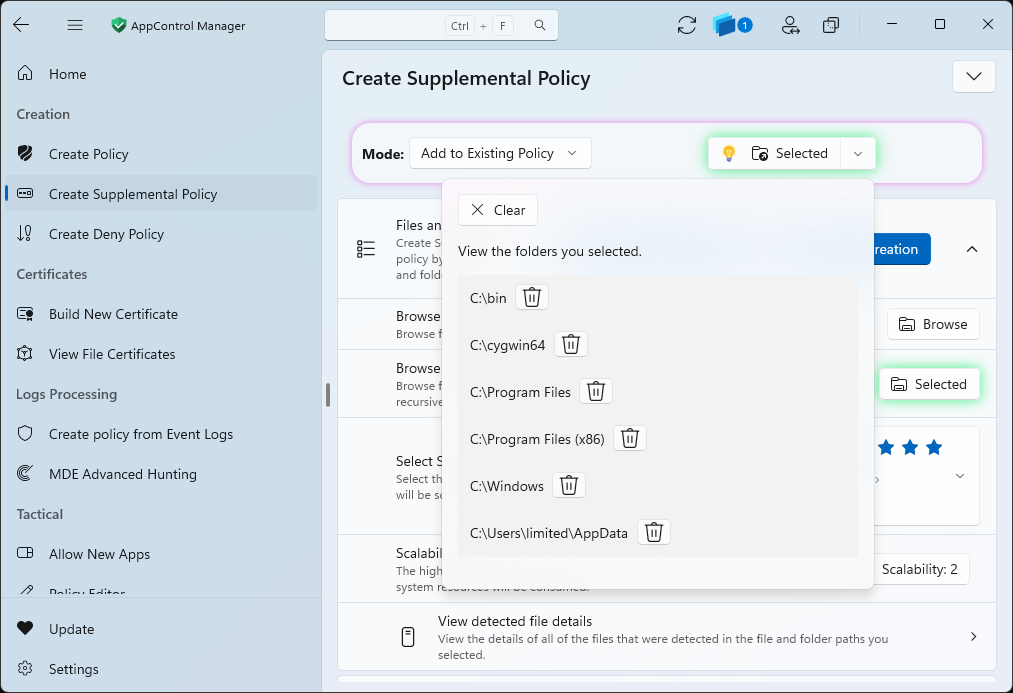
On this particular system, we have selected:
C:\bin
C:\cygwin64
C:\Program Files
C:\Program Files (x86)
C:\Windows
C:\Users\limited\AppData
Note our inclusion of our AppData directory in our profile directory. Modern software often installs here, so apps here may not be allowed if they’re not granted by the “Signed and Reputable” policy already. C:\Program Files\ and C:\Program Files (x86) should be explicitly added to cover any already-installed software. Plus pick any non-standard directories where you know software is installed to. You might as well add C:\Windows to cover already-installed software that splats itself right into the Windows directory instead of using the best practice of installing to one of the Program Files directories.
Finally, click the Create Supplemental Policy button to scan the directories and update the base policy file that you have selected. As long as you had Deploy after Creation enabled, this policy will be deployed automatically upon creation. Note that the process of scanning the directories can be time consuming.
Viewing policy details
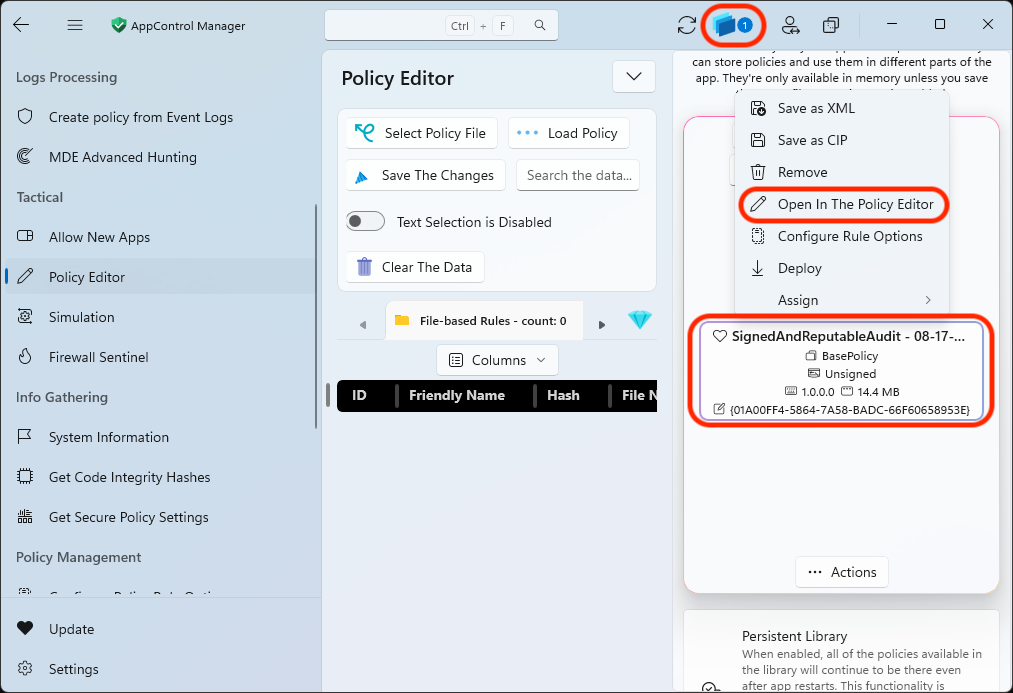
If you wish to view the details of any given policy, click the policy library icon near the top right corner of the app. Click the name of policy you wish to view, and then click Open In The Policy Editor. This will automatically open the policy in the Policy Editor section of AppControl Manager.
Here it will be obvious that these policies, especially after adding folders to allow, are not terribly user friendly.
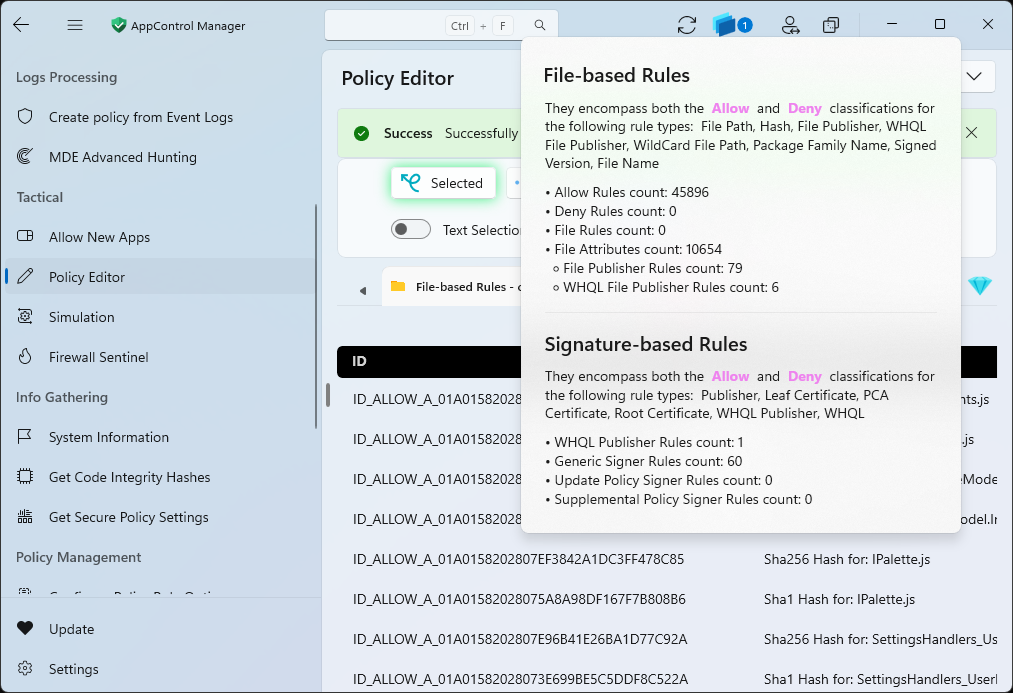
For example, in the screenshot above, we can see a number of .JS files, but what is not conveyed is why the files are there. If we investigate our system, we can see that these files live in C:\Program Files\WindowsApps. Therefore, when we created our supplemental policy to add C:\Program Files, these files were added to our policy.
By default, File-based rules are shown, but there are also tabs for Signature-based rules and more.
Deploy the policy in enforce mode
Now that we have our customized Application Control policy, we want to first remove the Audit property, and then deploy it.
Remove the Audit property
In AppControl Manager, click Configure Policy Rule Options and then click the drop-down menu to the left of Select Policy File. Click the policy that we want to modify.
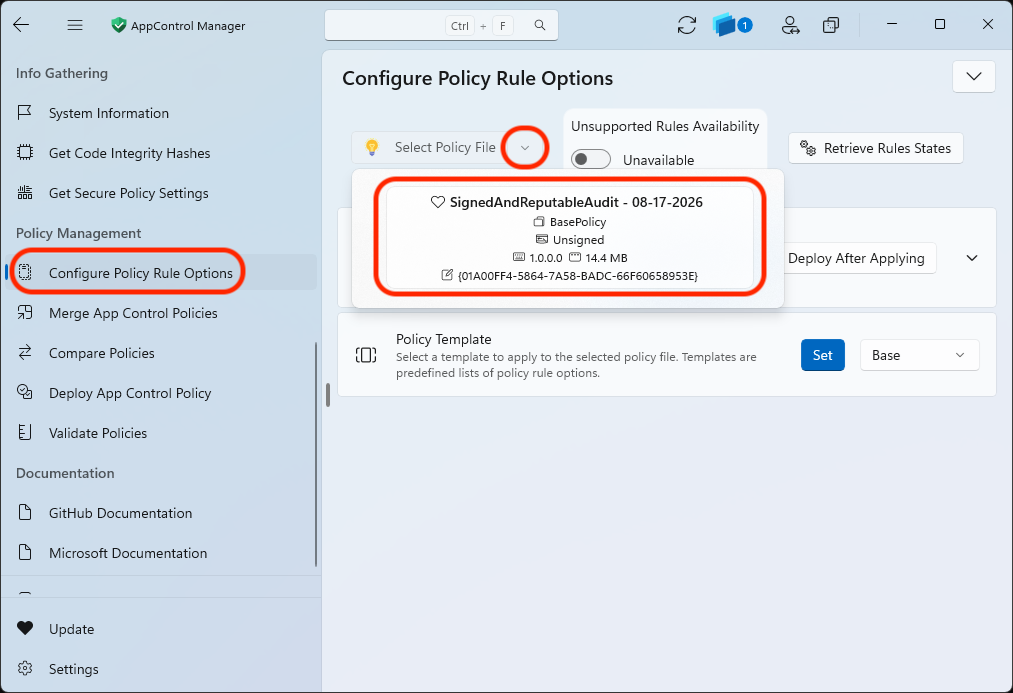
Click the Deploy After Applying button to toggle it on. Also click the drop-down arrow to the right to expand the section. You can see the details for the current policy after a short delay. Here we want to un-check the box next to Enabled: Audit Mode and then click the Apply the Changes button.
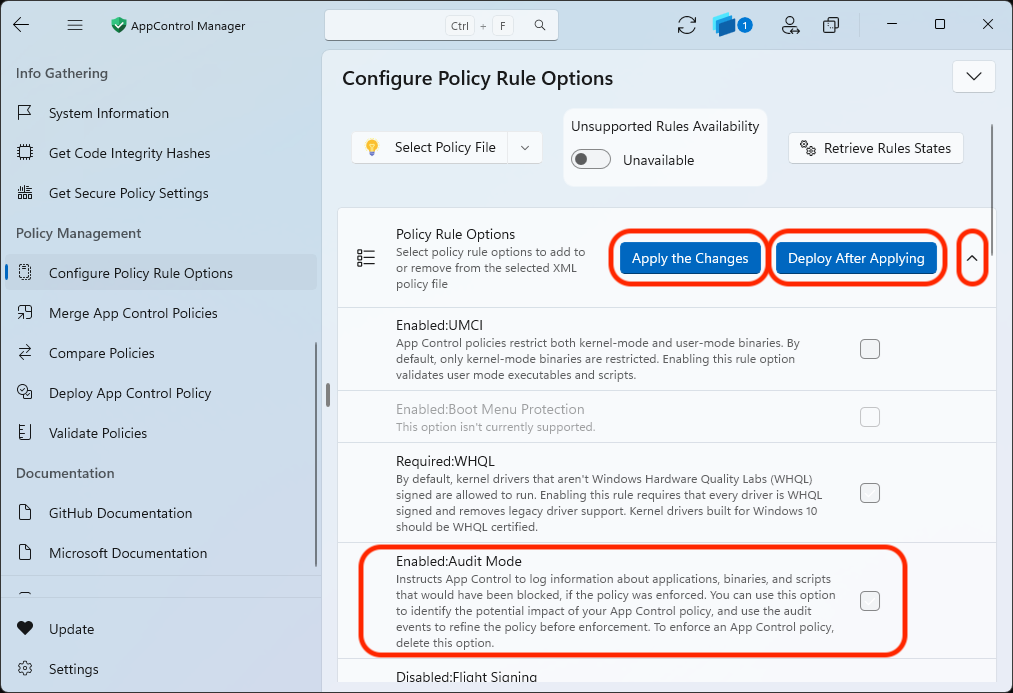
This will save and deploy the policy.
Manually deploying a policy
If in any of the prior steps, you forgot to enable the Deploy After ... toggle buttons, you can manually deploy an existing policy file. In AppControl Manager, click Deploy App Conrol Policy, click the drop-down arrow next to the Browse button in Deploy XML Policies (Unsigned) and select the policy you wish to deploy. Finally, click Deploy to deploy it.
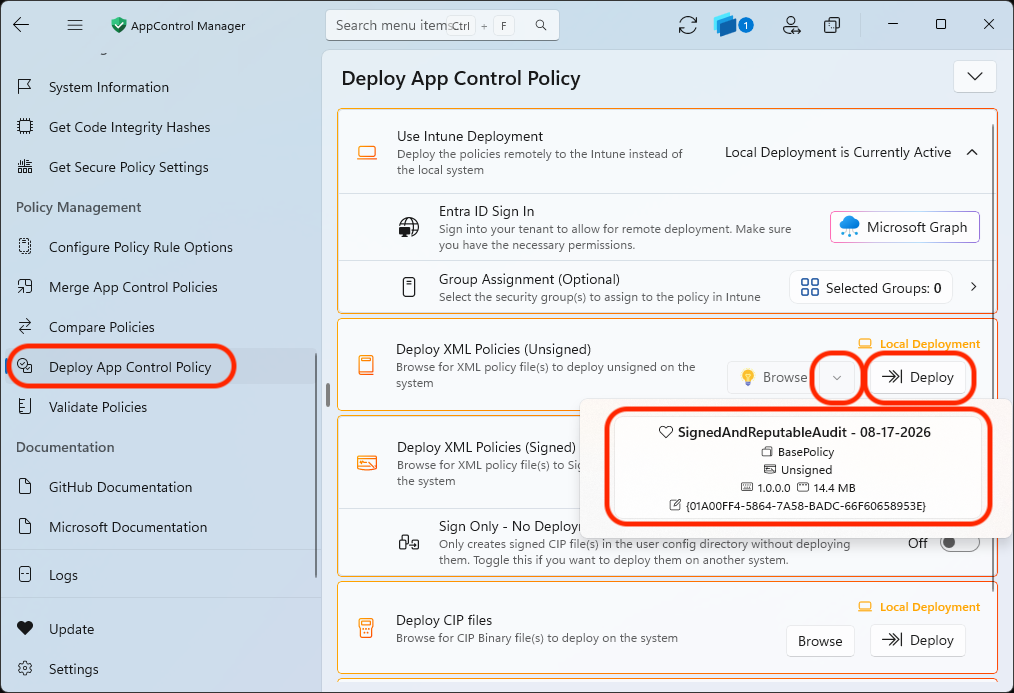
Reboot the computer.
Testing protections
A Warning – Smart App Control (SAC)
Due to a bug in Windows 11 25H2, an AppControl Policy of “Signed and Reputable” will NOT block unknown/untrusted execution if SAC is set to either Evaluation or On. This vulnerability has been reported to Microsoft, and they have indicated that they have no plans to fix the behavior because the behavior is expected.
Because Microsoft will not fix this vulnerability, either disable SAC or deploy a stronger base policy like Default Windows or Allow Microsoft.
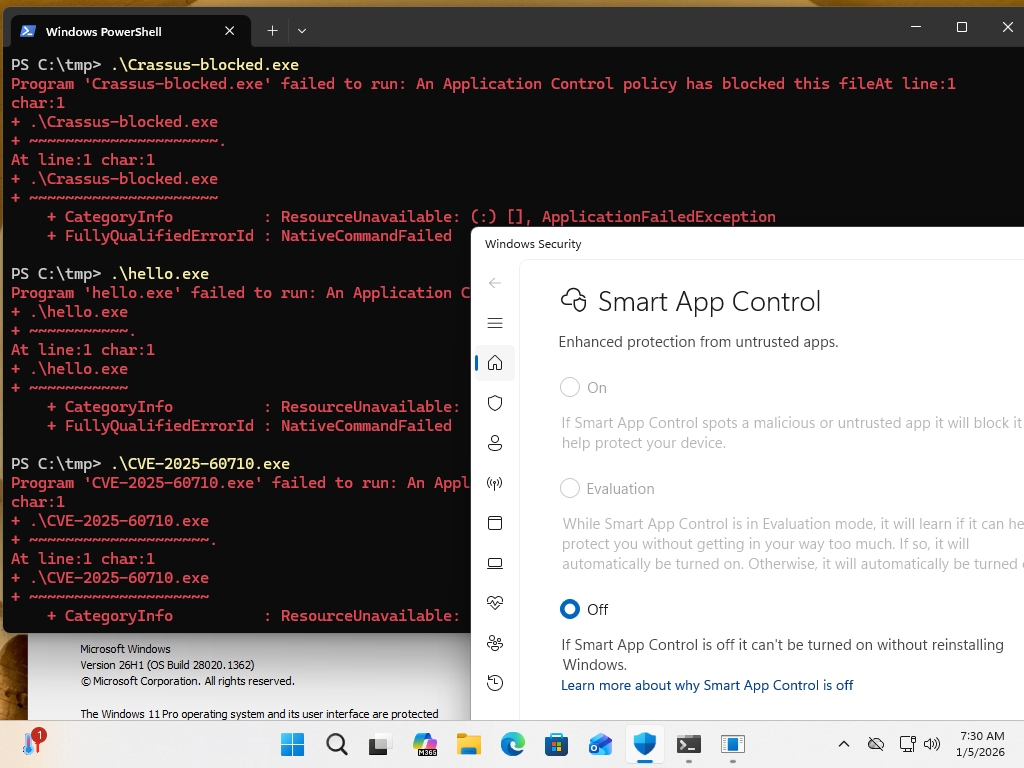
For the record, here’s a demonstration of the bug. If you have a “Signed and Reputable” policy enabled, random EXEs will not execute if SAC is off.
However, if we try that very same test on that very same machine with that very same “Signed and Reputable” App Control policy, but SAC is not off, the EXEs are allowed to run. Despite the fact that these EXEs are neither signed nor reputable.
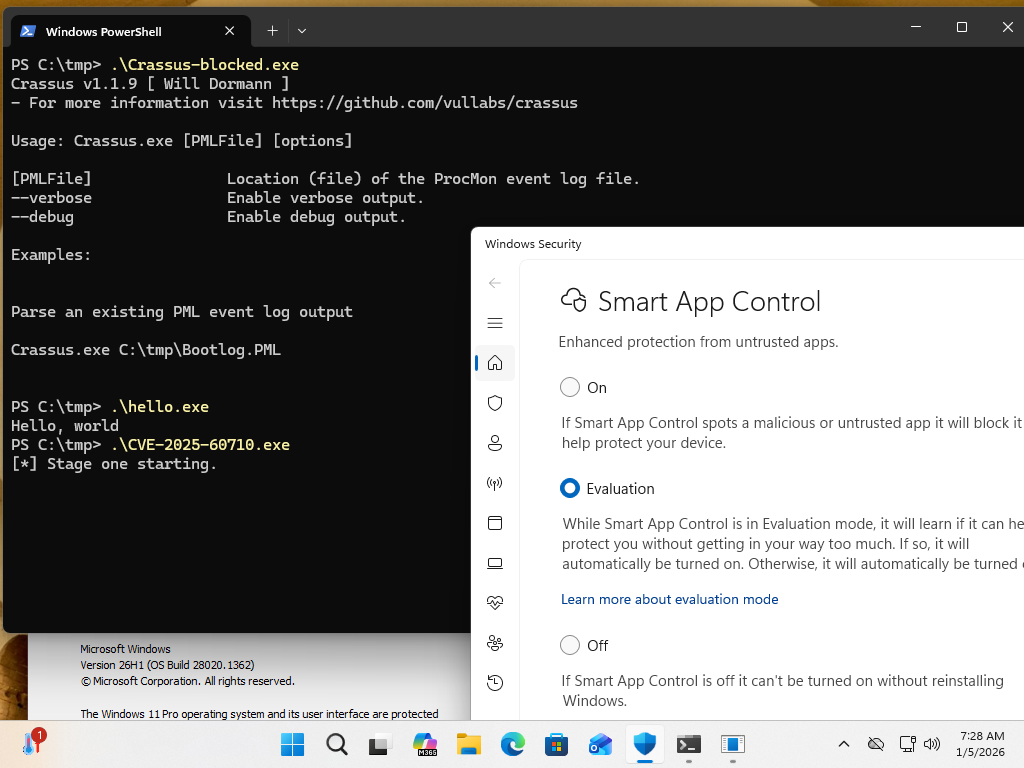
This issue has been reported to Microsoft, but they claim that this behavior should be expected by users. Obviously we disagree.
As of AppControl Manager v2.0.60.0, a warning will be displayed to the user.
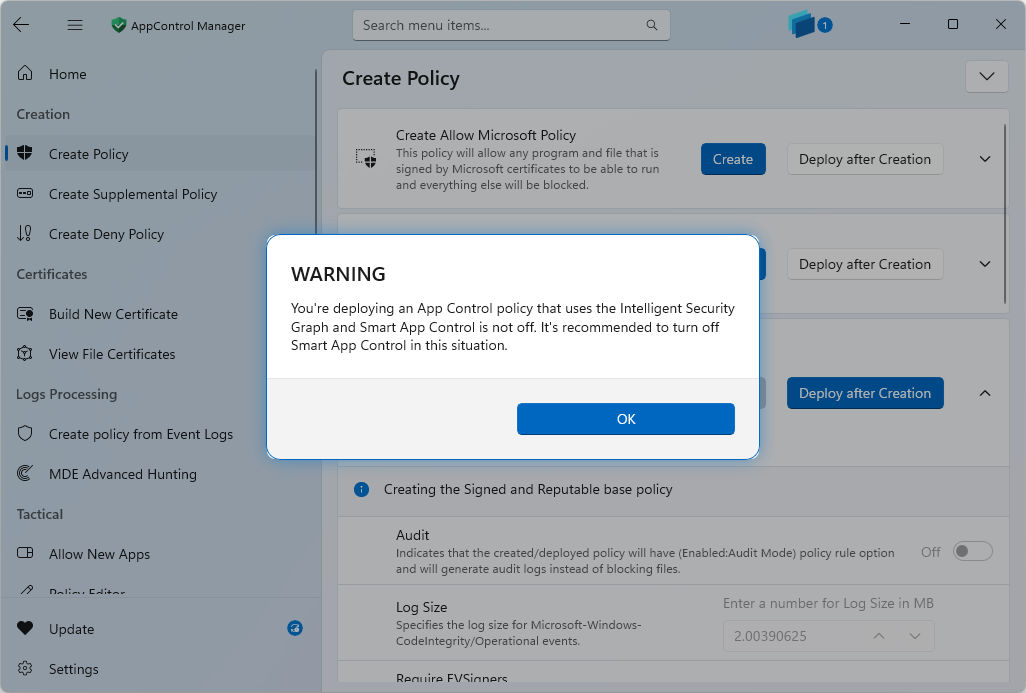
Blocked EXE
Our base policy is “Signed and Reputable”, so popular executables should work. But let’s try an obscure one:
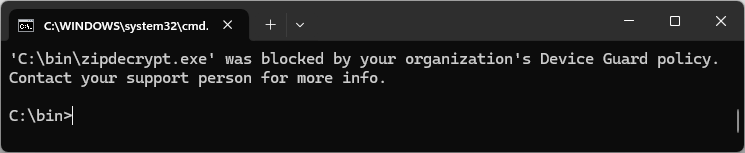
Good. We’ve confirmed that we can’t run an obscure EXE file on our system. Note that all malware EXE files would fall into this category of being blocked because they’re not “Signed and Reputable.”
Blocked by DLL
Not all blocking will be as obvious as the EXE being blocked. Sometimes an app will fail by way of a DLL it is attempting to load. For example, let’s try running a DLL that simply pops calc.exe when it is run:
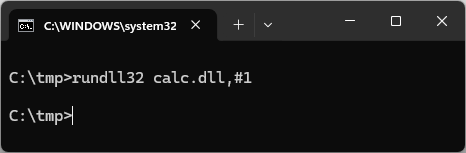
rundll32.exe is surely allowed, but the DLL code doesn’t execute. This is good.
It is important to recognize that not all malicious code execution happens by way of running a malicious EXE file. It is common for attackers to load malicious libraries into otherwise legimate processes to cause their malicious code to execute. Our WDAC policy does not allow this.
Allowed by reputation
When we selected our base policy, we chose “Signed and Reputable” to ease the pain of normal activities. For example, downloading and running the latest Google Chrome installer. Even with our WDAC policy active, we can still run it:
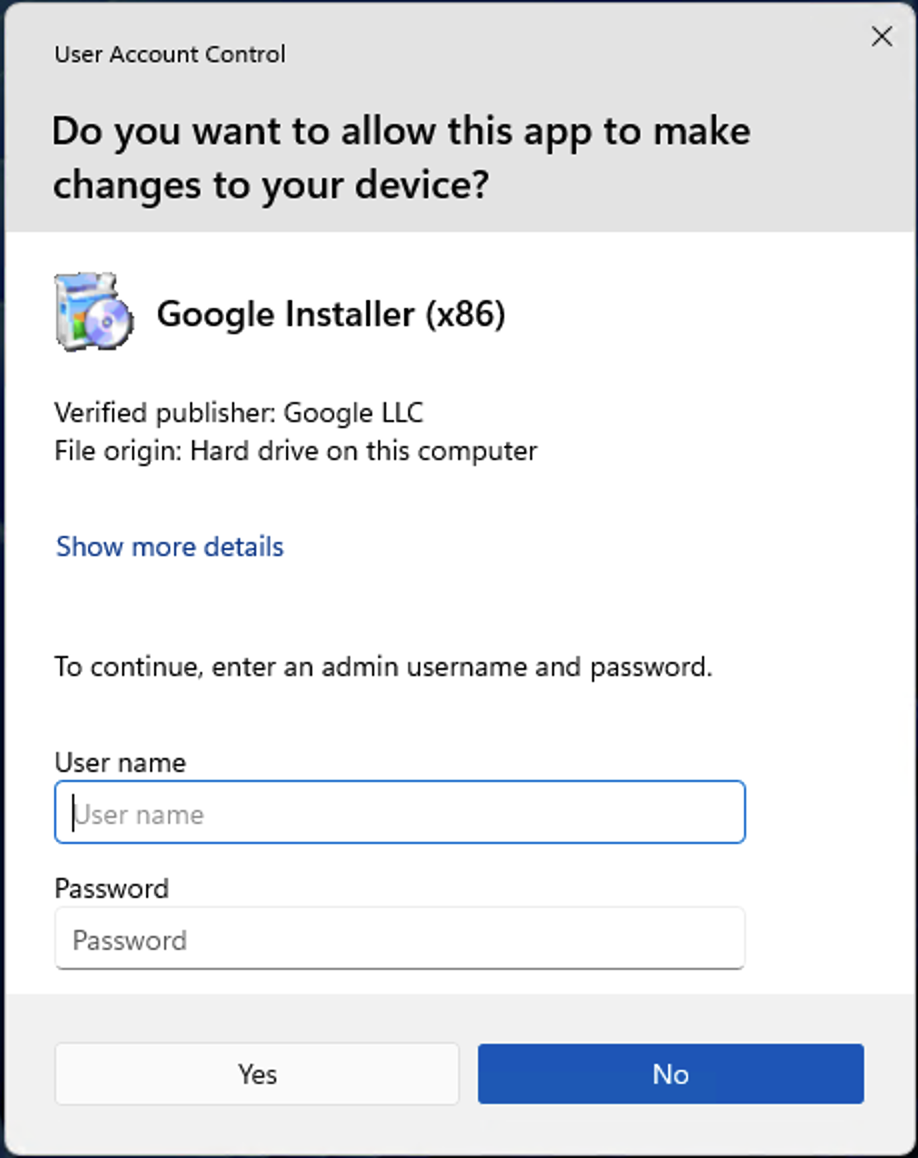
Note that we can see evidence of having run Harden System Security by way of the User name field not being pre-populated with an admin account name.
Had we chosen a more locked-down base policy, such as Allow Microsoft or Default Windows, then we would have needed to go through the dance to allow a new app and its dependencies, simply to get and run a normal, expected application. And we would likely need to do this for every single app that we have decided that we want to install and run.
Signed and reputable is a good sweet spot between the YOLO default configuration of Windows where everybody who is attacked gets compromised, and the strictest Default Windows setting, where one will only be able to run Windows and Office components and nothing else without WDAC administrator intervention.
About this “Signed and Reputable” protection level
Now might be a good time to discuss what exactly the Signed and Reputable protection level gets us. According to Microsoft:
Signed and Reputable mode authorizes the following components:
Windows operating components – any binary installed by a fresh install of Windows
Apps installed from the Microsoft Store
Microsoft Office365 apps, OneDrive, and Microsoft Teams
Third-party Windows Hardware Compatible drivers
All Microsoft-signed software
Files with good reputation per Microsoft Defender’s Intelligent Security Graph technology
Of particular interest is the Intelligent Security Graph (ISG) technology feature. Especially due to the online checking nature of this feature, this feature can be nondeterministic. In Microsoft’s words:
This cloud-based AI is based on trillions of signals collected from Windows endpoints and other data sources, and processed every 24 hours. As a result, the decision from the cloud can change.
If this level of protection makes you uncomfortable, then by all means choose the Allow Microsoft or Default Windows policies. They will absolutely give you more protection. But at what cost?
Unexpected behaviors
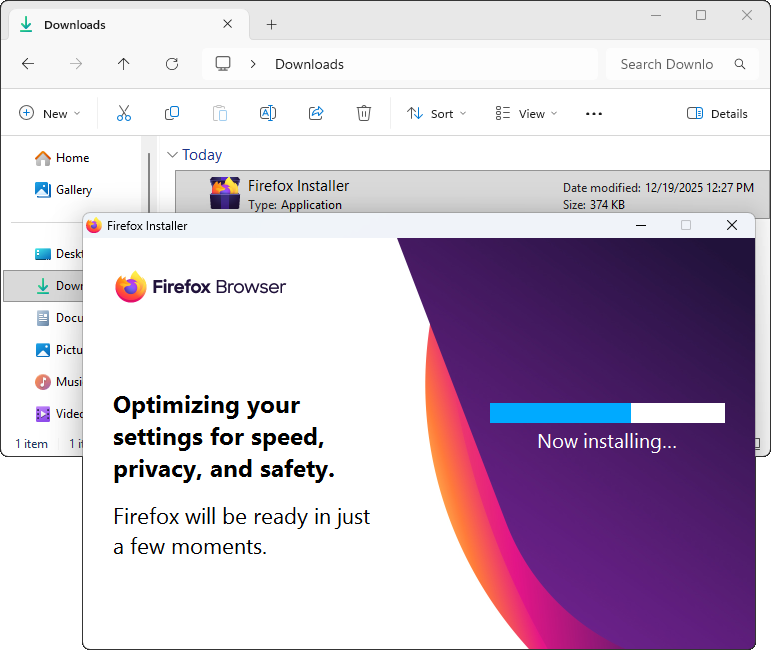
An application that is blocked by application control may fail in unexpected ways, especially if it’s not the EXE itself that is blocked, but rather some sub-component of it. Let’s consider the Firefox installer for example:
Signed and Reputable
When we run the Firefox installer on a system with a Signed and Reputable WDAC policy, it behaves as expected. The installer completes successfully, and the browser works as expected after it’s installed. No special allow-listing required.
Microsoft Only
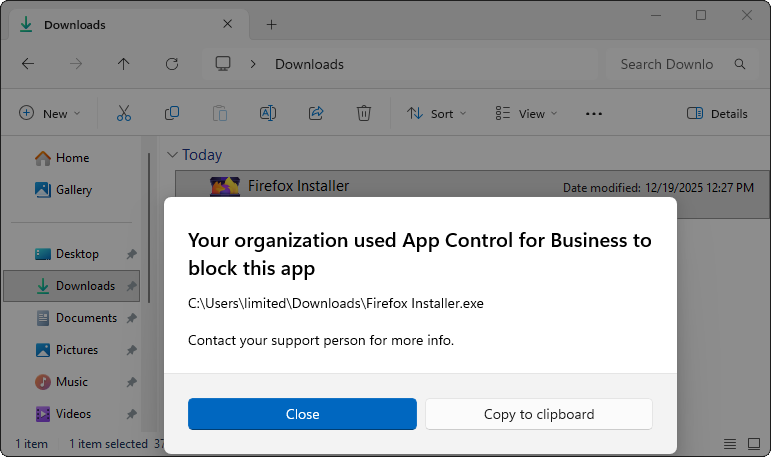
When we run the Firefox installer on a system with a Allow Microsoft WDAC policy, it fails in an expected manner. Our policy allows Microsoft-signed apps to run, but the Firefox installer is signed by Mozilla. So obviously it won’t run.
Microsoft Only with supplemental policy for installed software
What happens when we try running the Firefox installer on a system that has the Microsoft Only base policy, but also has a supplemental policy added to allow the software already on the system, which includes a version of Firefox.
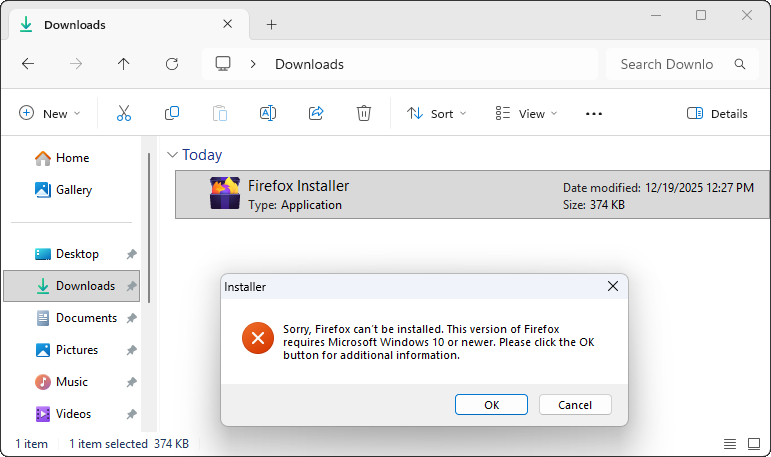
This is a Windows 11 system, so that error doesn’t make any sense at all. However, if we look in the AppControl Manager logs, we can see exactly what is happening:
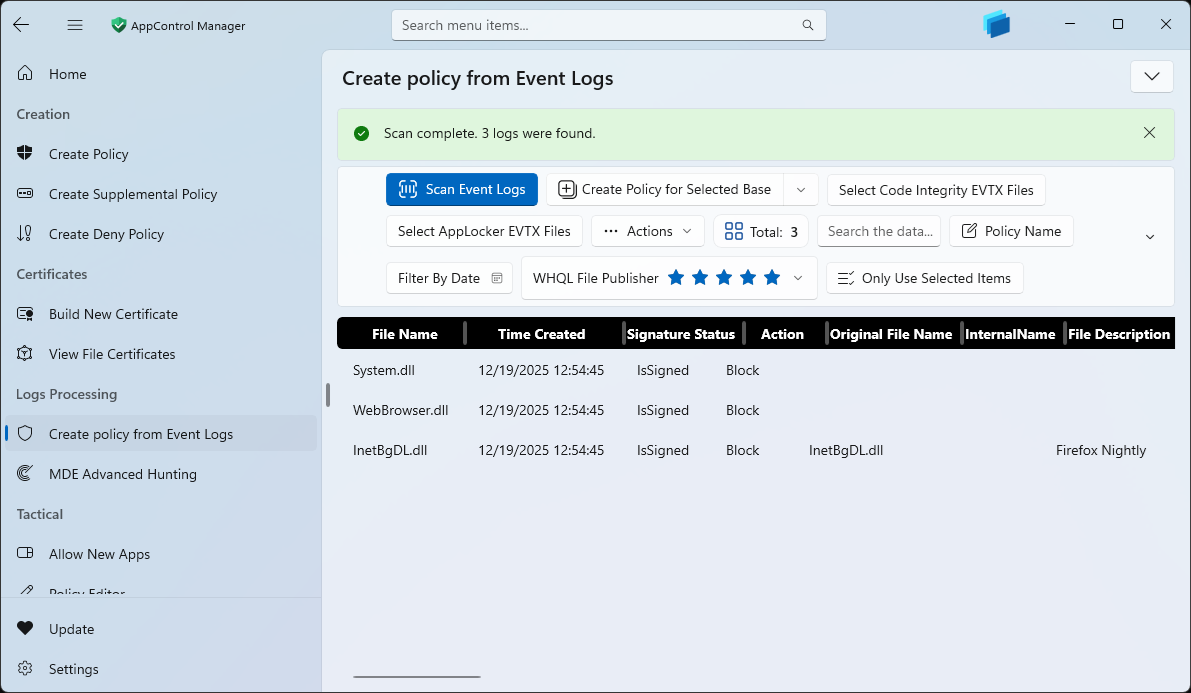
Here it is clear that a Firefox DLL was blocked. We’ll cover more details about the confusing Firefox installer error below.
If we know that we have a restrictive WDAC policy on our system and we have administrative access to the system, we can simply run AppControl Manager to parse event logs, if we are wise enough to recognize that restrictive WDAC policies can cause apps to fail in unexpected ways.
Or if we are a power user without admin privileges, we can indeed view CodeIntegrity logs in Event Viewer to see that it was WDAC that interfered with our Firefox installation.
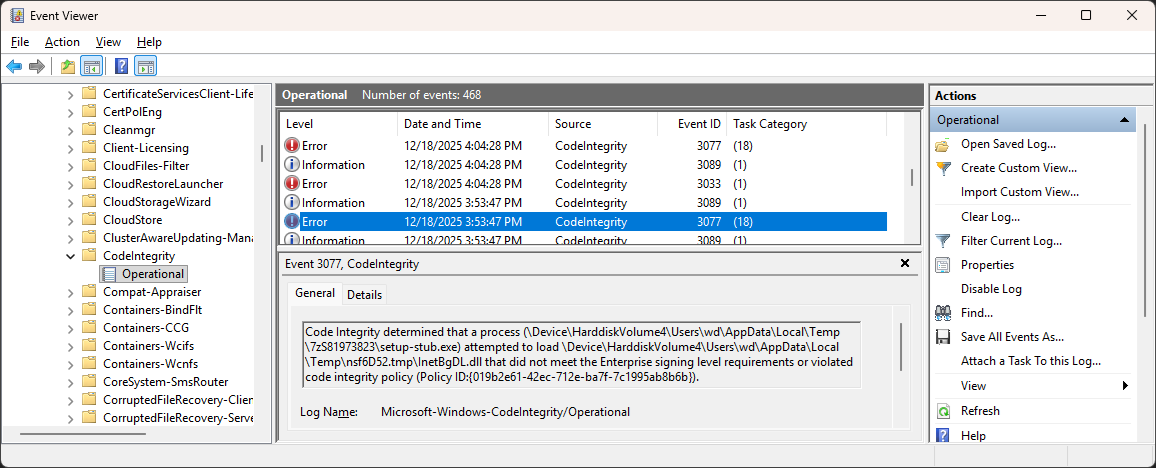
However, let’s be reasonable here. Nobody wants to troubleshoot Windows things that fail in unexpected ways. In this particular case, the Firefox installer was allowed to execute due to an already-allowed signature in the installed Firefox product. But three libraries that the Firefox installer attempted to load after launching were blocked by our WDAC policy. And due to this failure, the Firefox installer presented a misleading error to us. The problem is not that the system is not Windows 10 or newer. The problem is that the Firefox installer, which spawns a process called setup-stub.exe, which subsequently attempts to load System.dll. While this library has a signature that expired in 2024, that’s not the problem. The problem is that with our WDAC policy that allows Microsoft-signed code and also already-present code to run, the signature for this System.dll file was not present in our allow list. The setup-stub.exe program treated the inability to load System.dll library as evidence that it is not on a Windows 10 or newer platform, as opposed to simply checking if it is running on Windows 10 or newer.
Is this technique used by the Firefox installer for determining if it’s running on a version of Windows older than 10 less than ideal? Probably. But the point is, there’s lots of software out there, potentially doing things in unexpected ways.
Yes, Allow Microsoft and Windows Only WDAC policies are deterministic and more secure than Signed and Reputable. However, this extra security comes at a cost. When choosing which WDAC policy to deploy, consider how important is it for this system to be secured, and whether you are willing to perform the extra work to maintain a system that is locked down so strongly.
Merging policies
If in any of the above steps, you did not select Add to Existing Policy, you’ll have a new separate policy file to apply alongside your main base policy. If having multiple policy files turns out to be too unwieldy, we can merge our base policy and any new policy file that we have created.
In AppControl Manager, go to Merge App Control Policies. Click the drop-down to the right of the Browse button in the Select Main Policy section. Select your main policy. Then click the drop-down to the right of the Browse button in the Select other policies section. Click the policy that you’d like to be merged into the main policy. In the case below, we have a policy called Python that we want to merge into our main policy.
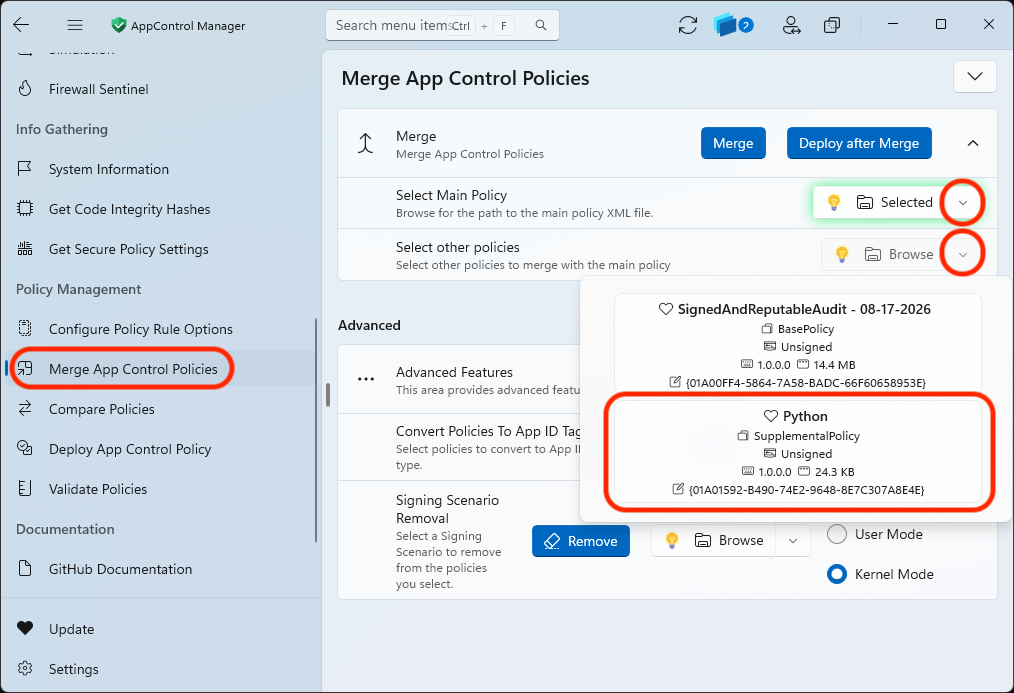
When you click Merge, the supplemental policy will be merged into the main policy, overwriting the original file. So perhaps have a backup of this file if you are concerned about breaking a known-good policy.
Removing an Application Control policy
There are certain scenarios where you may need to remove an installed Application Control policy. For example, if you had Deploy After Applying enabled and you deployed what you considered the same policy multiple times after changing settings, AppControl Manager considers each deployed policy to be unique.
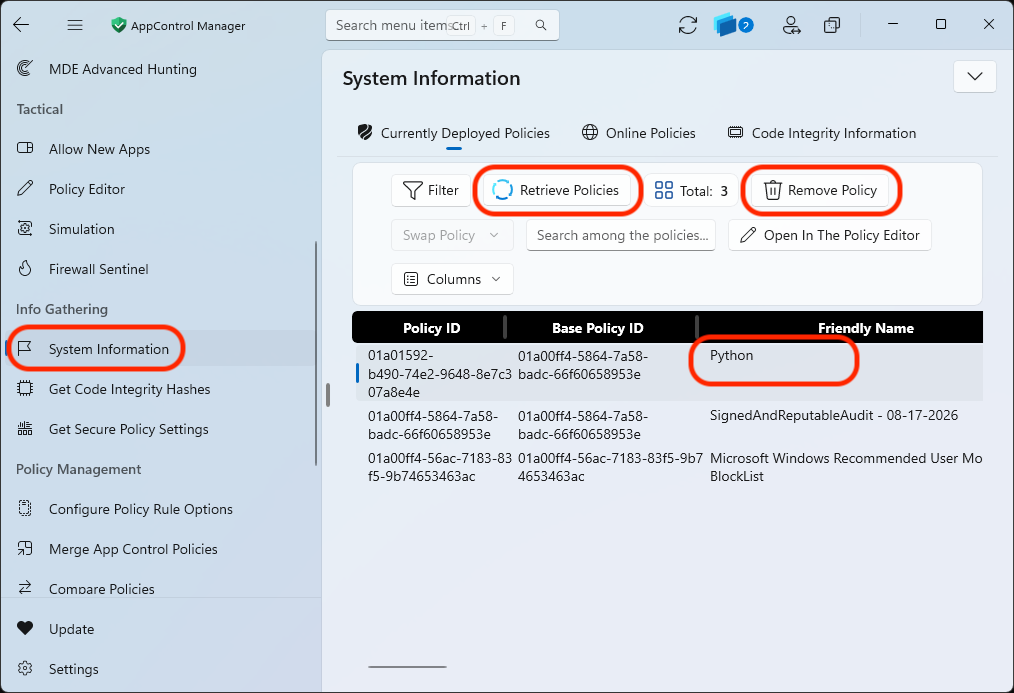
Click on System Information, click Retrieve Policies, select the policy that you’d like to remove (you may need to scroll horizontally to see the friendly name, and finally click Remove Policy
Deploying a Signed App Control policy
All of the above is great in that it can block unwanted things from running, including drivers. So this should be able to protect against BYOD attacks, right?
Let’s think about this for a moment. In a bring-your-own-driver attack, an attacker loads their own driver. And therefore, this attacker has admin privileges. The WDAC policy is fine and good, but if we have an attacker with admin privileges, can’t they just apply their own WDAC policy that allows the driver they’re bringing?
YES
Good for you for thinking about this. So, what’s the protection against such admin-privileged attackers?
Signed WDAC policies. As mentioned a few years ago in the blog post BYOVD Protection Is A Lie. AppControl Manager brings the ability to use signed WDAC policies to the masses.
Note that Secure Boot is required to have a fully immutable signed WDAC policy. Without Secure Boot, a crafty admin-privileged attacker may be able to bypass the signed policies that are present both in Windows and in the UEFI partition, thus defeating the WDAC protections.
Build New Certificate
AppControl Manager has a section called Build New Certificate. We will admit that this section is modestly named, as this capability provides an entire secure key management and signing infrastructure. But let’s have at it:
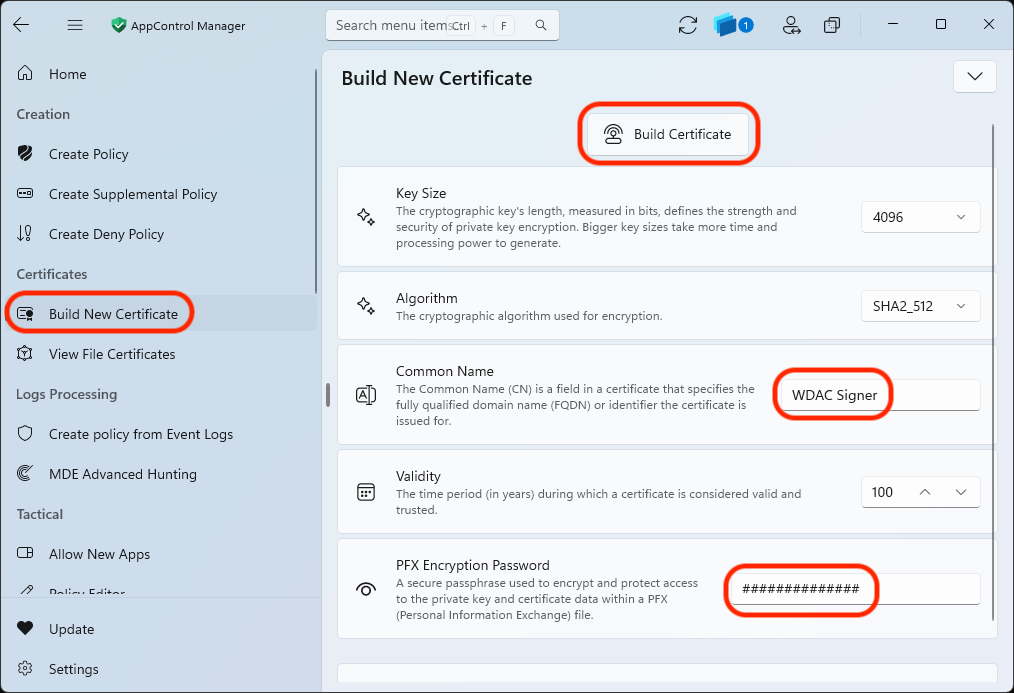
Here we have clicked Build New Certificate on the left, and we fill out a CN for our certificate. You can put whatever you like, but we chose WDAC Signer. Also specify a password for the PFX file that will contain the private key. We suggest having your password manager generate and save a password for this certificate, as we don’t want to forget it, and the password used in the upcoming step is mandated by Windows to be secure.
When we press Build Certificate, we are prompted by Windows for a password, where we’ll enter the same password that we used for the PFX file.
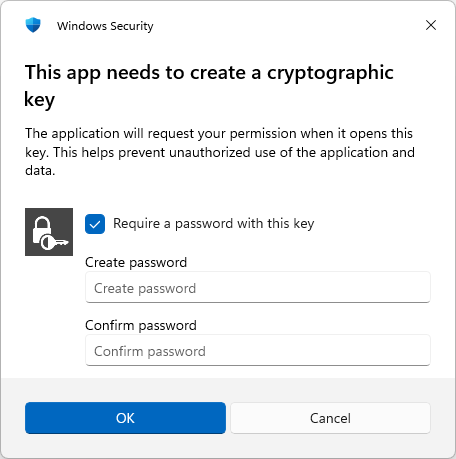
AppControl Manager is doing something clever here in requiring a password to use the key. A signing key that is simply imported into the Windows keystores will be accessible to users on the system. As such, a WDAC signing key that is created in the traditional manner of importing it into certmgr will be at risk of an attacker using the signing key if it is left behind after deployment.
Signing and Deploying a WDAC policy
In AppControl Manager, select Deploy App Control Policy. Click the drop-down to the right of the Browse button in the Deploy XML Policies (Signed) section and select the policy you wish to sign and deploy.
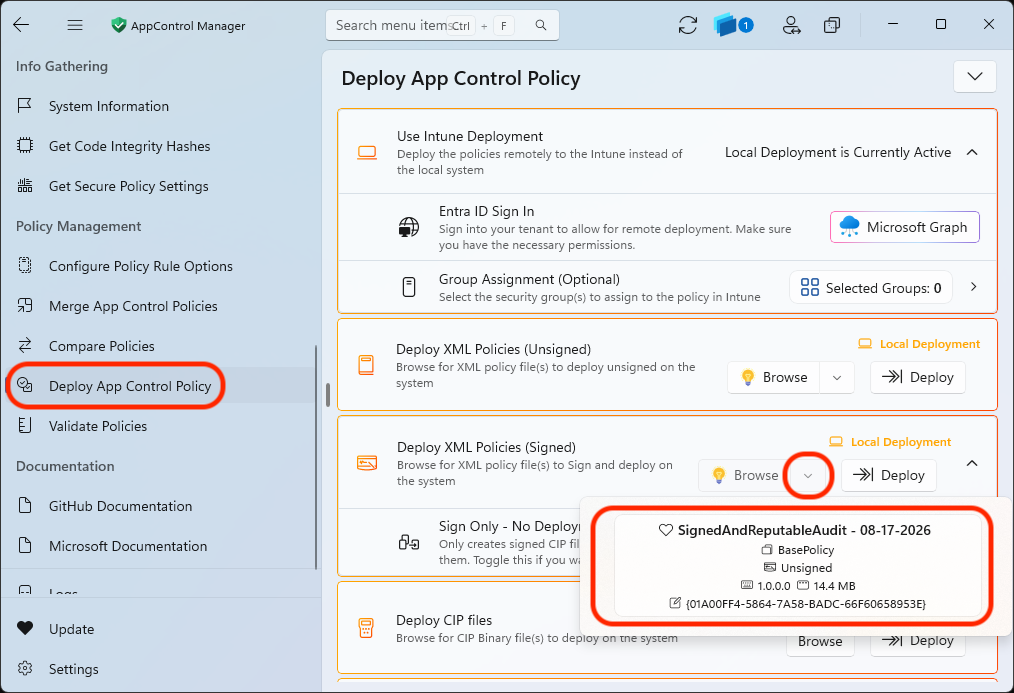
Once we have selected our “Signed and Reputable” policy, click the Deploy button.
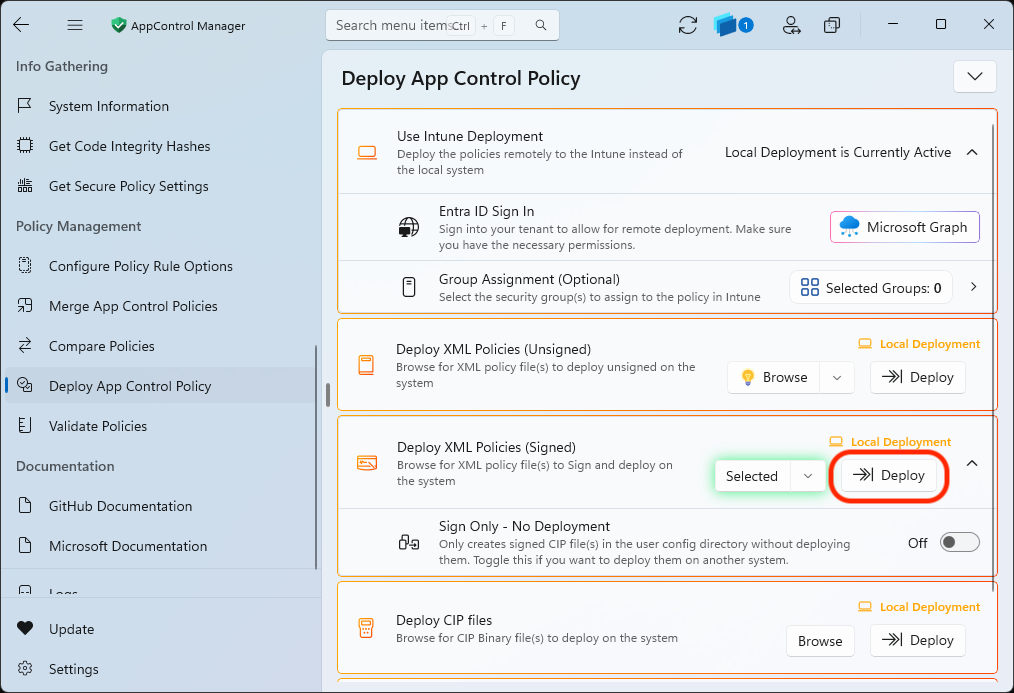
When we click Deploy we are presented with the signing details page.
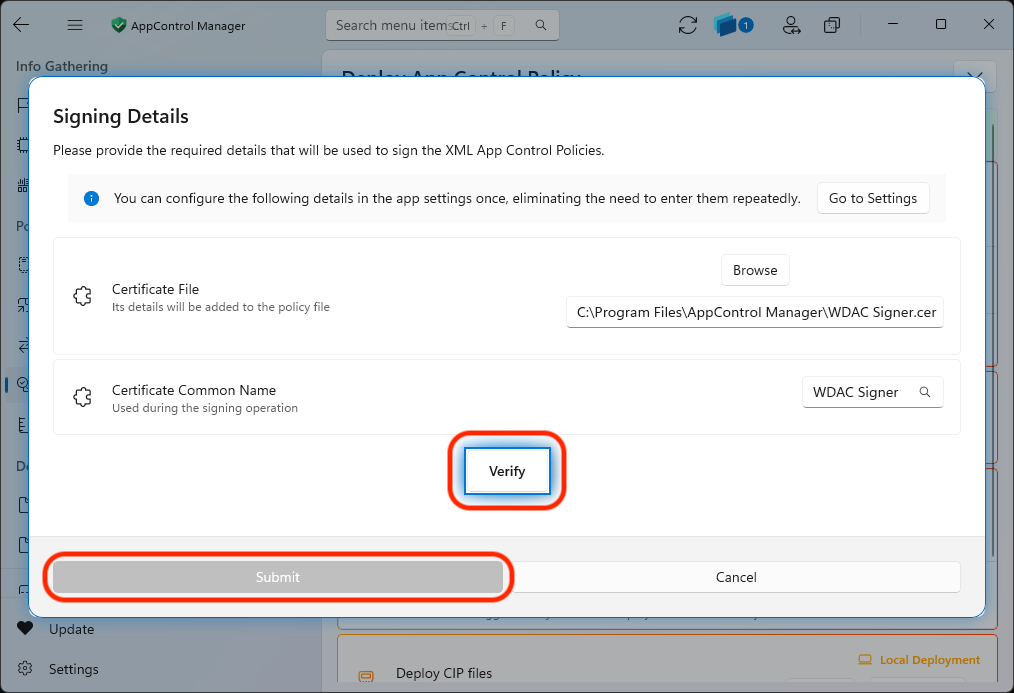
On this page, first click Verify and then Submit once that has succeeded.
About that key password
The above steps succeeded without needing to enter our key password. How did this happen?
Since we’re in the same instance of AppControl Manager that specified the password for our signing key, this app is already authenticated to use the key. So not being prompted is expected.
However, if we reboot and attempt to deploy a new signed policy, we can see that we are prompted for the key password:
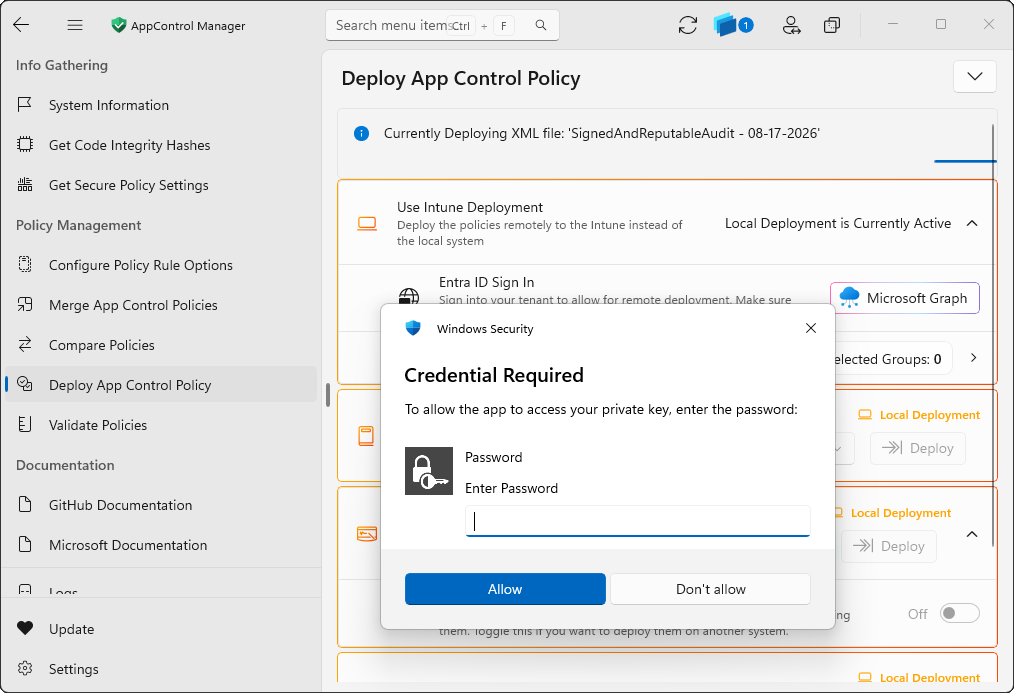
The requirement of this password conveys the protection level that a signed WDAC policy gives you. When a signed WDAC policy is deployed, any updates to the policy must also be signed by the same signer. So if an admin-credentialed attacker is on your system, they would only be able to modify the WDAC policy if they have this password for the policy signing key.
As long as you properly protect this password, you can kiss BYOD attacks goodbye with a signed WDAC policy.
Confirming WDAC settings
If you wish to confirm the app control settings that you believe you have deployed, you can click the System Information link on the left and then click the Retrieve Policies button.
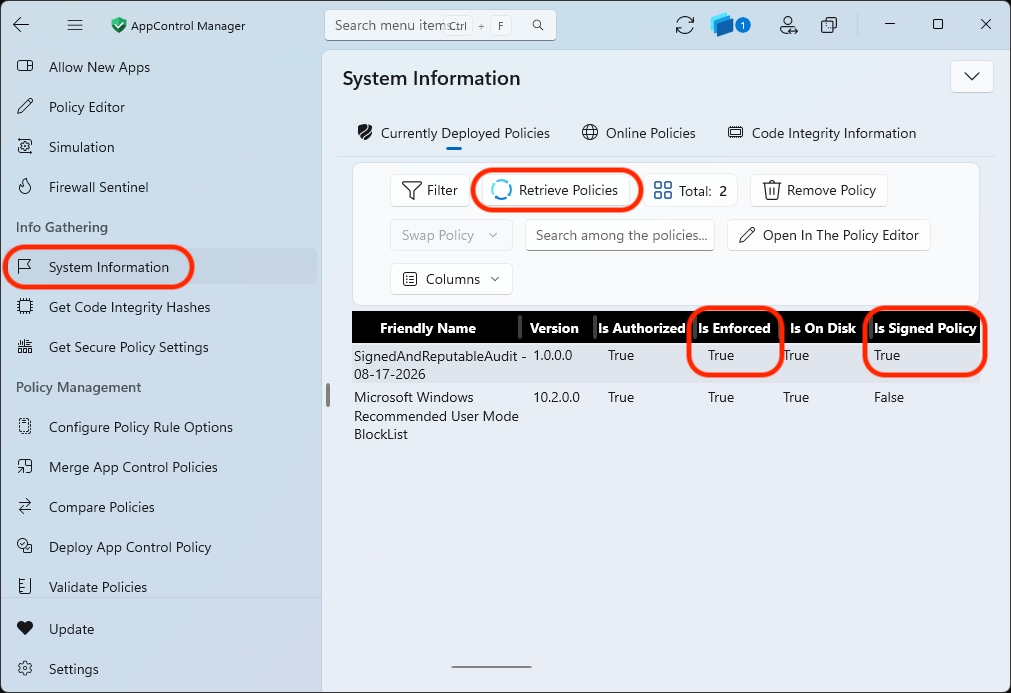
In this example, we can see that we have a SignedAndReputableAudit policy that was created on August 17, 2026. We can see that it is both Enforced and also Signed.
Confirming signed WDAC policy protection
We can confirm that a signed WDAC policy is immutable by attempting to allow a new application with AppControl Manager and deploying it as an unsigned policy.
You will note that no changes from an unsigned policy will override a signed policy. That is, an unsigned WDAC policy cannot allow an application that a signed WDAC policy will block.
For changes to be made to a signed WDAC policy, the changes must be deployed as a WDAC policy that is signed with the same key.
About “Deploy after Creation” after implementing a signed WDAC policy
The Deploy after Creation toggle button that we’ve used earlier simply deploys the policy in an unsigned manner after it has been created. And as confirmed above, we recognize that unsigned policies cannot override a signed WDAC policy in place.
As such, when making adjustments to a WDAC policy after a signed policy has been deployed, the policy must be deployed in a signed manner as described above.
Removing a signed WDAC policy
Removal of a signed WDAC policy is by design difficult to do. Microsoft has this process documented here:
https://learn.microsoft.com/en-us/windows/security/application-security/application-control/app-control-for-business/deployment/disable-appcontrol-policies
However, AppControl Manager makes the process much easier.
Remove Application Control Policy with AppControl Manager
Click on System Information, click Retrieve Policies, select the policy that you’d like to remove (you may need to scroll horizontally to see the friendly name, and finally click Remove Policy. You will be prompted for the signing key password if it is not already cached.
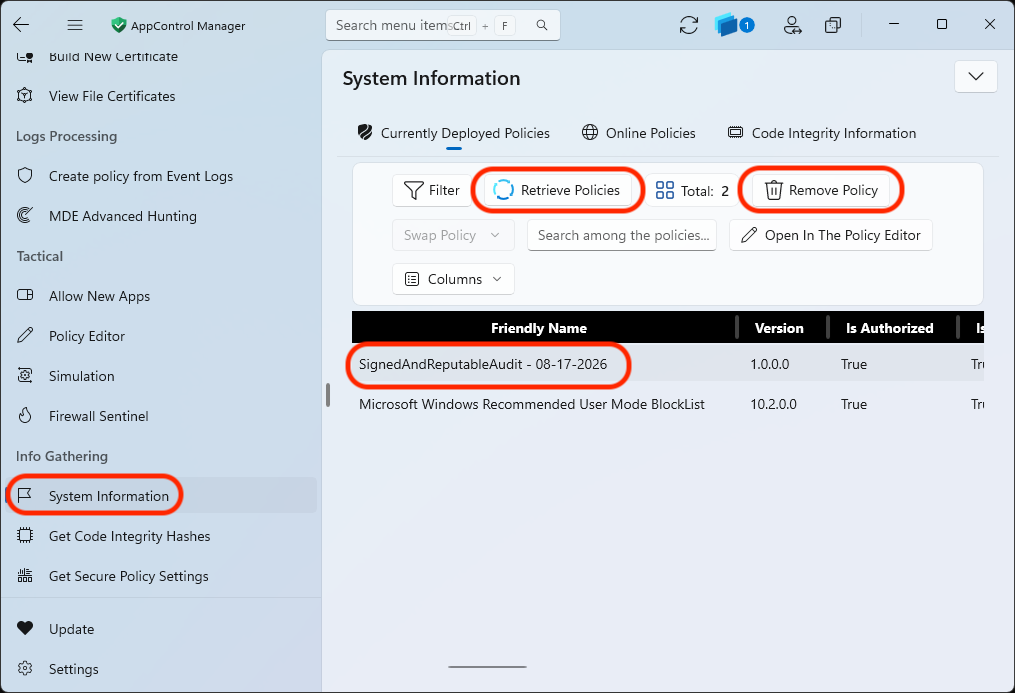
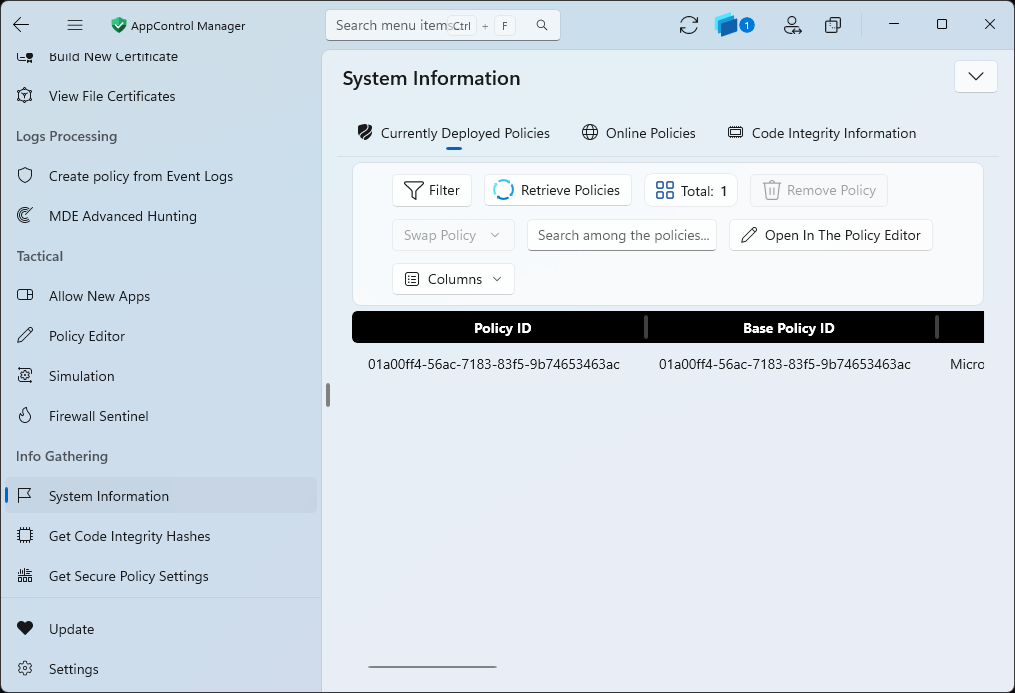
Due to the way that SecureBoot and EFI work, the policy removal will not activate immediately. Reboot your computer and perform the exact same steps again:
Upon this second removal, the policy will be removed immediately and will disappear from the screen, and will no longer be active in Windows.
Testing a real-world exploit
Let’s test a not particularly clever exploit that is claimed to be used by APT in the wild:
https://unit42.paloaltonetworks.com/hamas-affiliate-ashen-lepus-uses-new-malware-suite-ashtag/
Specifically the 3502c9e4896802f069ef9dcdba2a7476e1208ece3cd5ced9f1c4fd32d4d0d768 sample.
The attack works by:
-
Victim receives RAR file with malicious contents
-
Victim double-clicks on the EXE file
-
Victim is required to click on the
Extract allbutton and extract the files
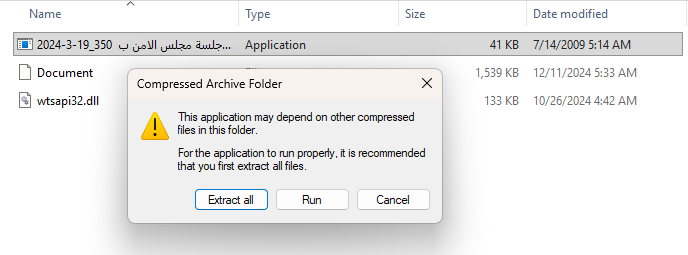
-
Victim is required to click on the EXE file again
It’s lovely how the “A” in APT stands for Advanced, yet security organizations continue to use the term to describe stuff that is clearly amateur hour. But we digress…
Stock Windows 11
On a stock Windows 11 system, the EXE file executes when it is double-clicked. As long as the victim did the Extract all step, the basic flow of the malware is:
- EXE loads
wtsapi32.dlland executes itsDLLEntryPoint
Note that this library contains a signature from Microsoft.
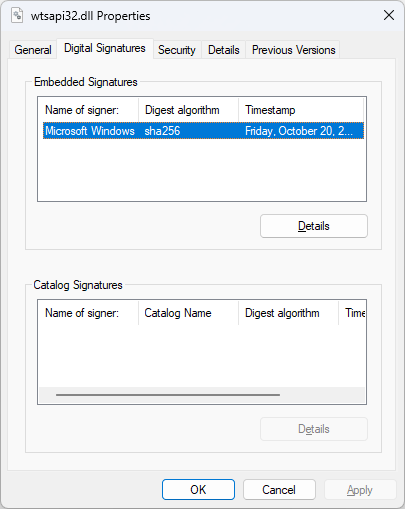
However, we diligent infosec enthusiasts can see that the signature present is clearly invalid. That is, somebody took a valid wtsapi32.dll file and modified it to perform other actions.
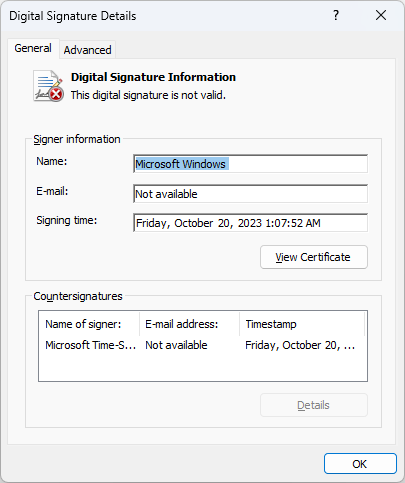
2. The code renames Document to Document.pdf and opens it.
3. Regardless of the result of this renaming and opening, the code will contact status[.]techupinfo[.]com and take further actions to retrieve and execute further malicious payloads.

At this point, it should be assumed that the system has been compromised.
Harden System Security “Recommended” settings
If we try the same attack against a system that has the Harden System Security “Recommended” settings applied, we can see a slight difference:
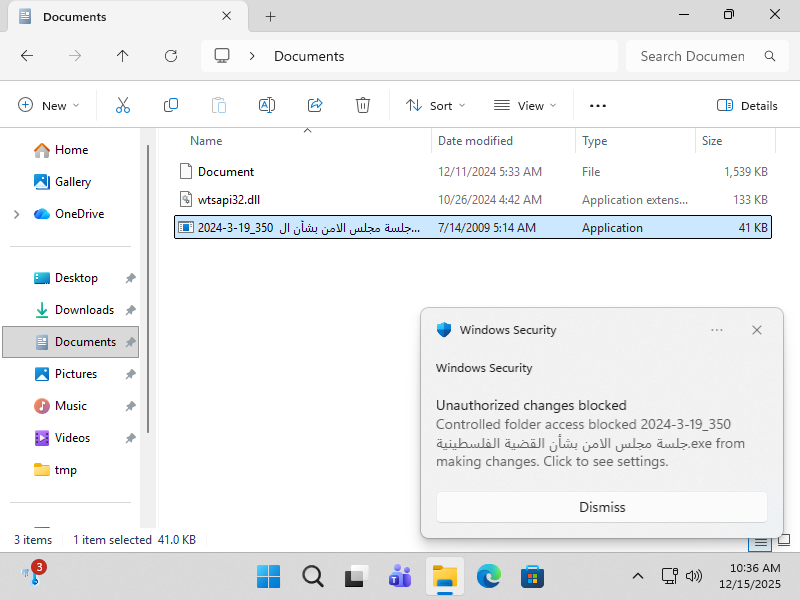
Was the attack blocked?
No, not at all. The act of an unknown executable renaming a file in the Documents directory is blocked by one of the hardening settings. Note that other directories are not similarly protected. That is, if these files were in the Downloads or other directory, we wouldn’t see any change between our hardened Windows system and a stock Windows system.
However, due to how the malware is designed, the mere fact that the renaming of the file in Documents has failed does not prevent the rest of the malware execution. As such, even with Harden System Security enabled, the attack works. This is expected, however, as this attack simply relies on the victim running a malicious EXE file. No standard hardening features will prevent this from happening.
AppControl Manager policy deployed
Let’s try this attack on a system that has the AppControl Manager “Signed and Reputable” policy deployed.
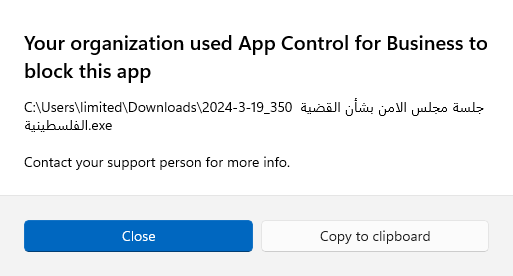
Yep. The malicious EXE is blocked, and a non-admin user has no way of allowing it to execute.
If the configured “Signed and Reputable” policy is deployed as a signed policy, this protection extends to also include attackers that have admin privileges, as long as the attacker does not know the password for the WDAC signing key.
Conclusion
If you made it this far, congratulations! Truly locking down Windows takes a bit of work. If you made it this far by actually following these steps and the prior hardening steps on your Windows system, then you have earned the reward: A pretty secure Windows system.