
Overview
HotCakeX has created a pair of open-source tools collectively known as Harden Windows Security.
https://github.com/HotCakeX/Harden-Windows-Security
The two components are:
- Harden System Security (The focus of this blog post)
- AppControl Manager (Will be discussed in a future blog post)
The above links are Microsoft Store links, which makes each component installable with a click. The GitHub link above is for providing further documentation and also the ability to analyze the source code.
Supported operating systems currently include:
- Windows 11 25H2
- Windows 11 24H2
- Windows 11 23H2
- Windows 11 22H2
- Windows Server 2025
Harden System Security should be the less-intrusive change, so this should be performed first.
AppControl Manager is the holy grail of Windows Security, in that it ends up with an allow list of what can run on Windows. So an arbitrary / malicious program will simply be blocked from executing on a system. This sort of configuration is arguably more secure than a stock Windows system with the best AV / EDR platform available installed on it. But it requires a bit of planning and testing, so this step should be performed only after you are comfortable with the system’s behavior after running Harden System Security.
In choosing which path(s) to take, take a moment to decide how secure you’d like your Windows system to be:
- I don’t want Windows to be secure: Take neither path.
- I want Windows to block some exploits: Use Harden System Security with a “Recommended” baseline.
- I want Windows to block some exploits and not run malware: Use Harden System Security with a “Recommended” baseline and use AppControl Manager to deploy a signed policy.
This final option will result in a Windows system that is by design more secure than any stock Windows system that simply has signature-based AV products and/or EDR software installed on it.
Here is a simplified flowchart with your options. The least secure option is at the top, with each end stage having increased security as you go down. The Done step at the very bottom is the ideal recommended hardening stage.
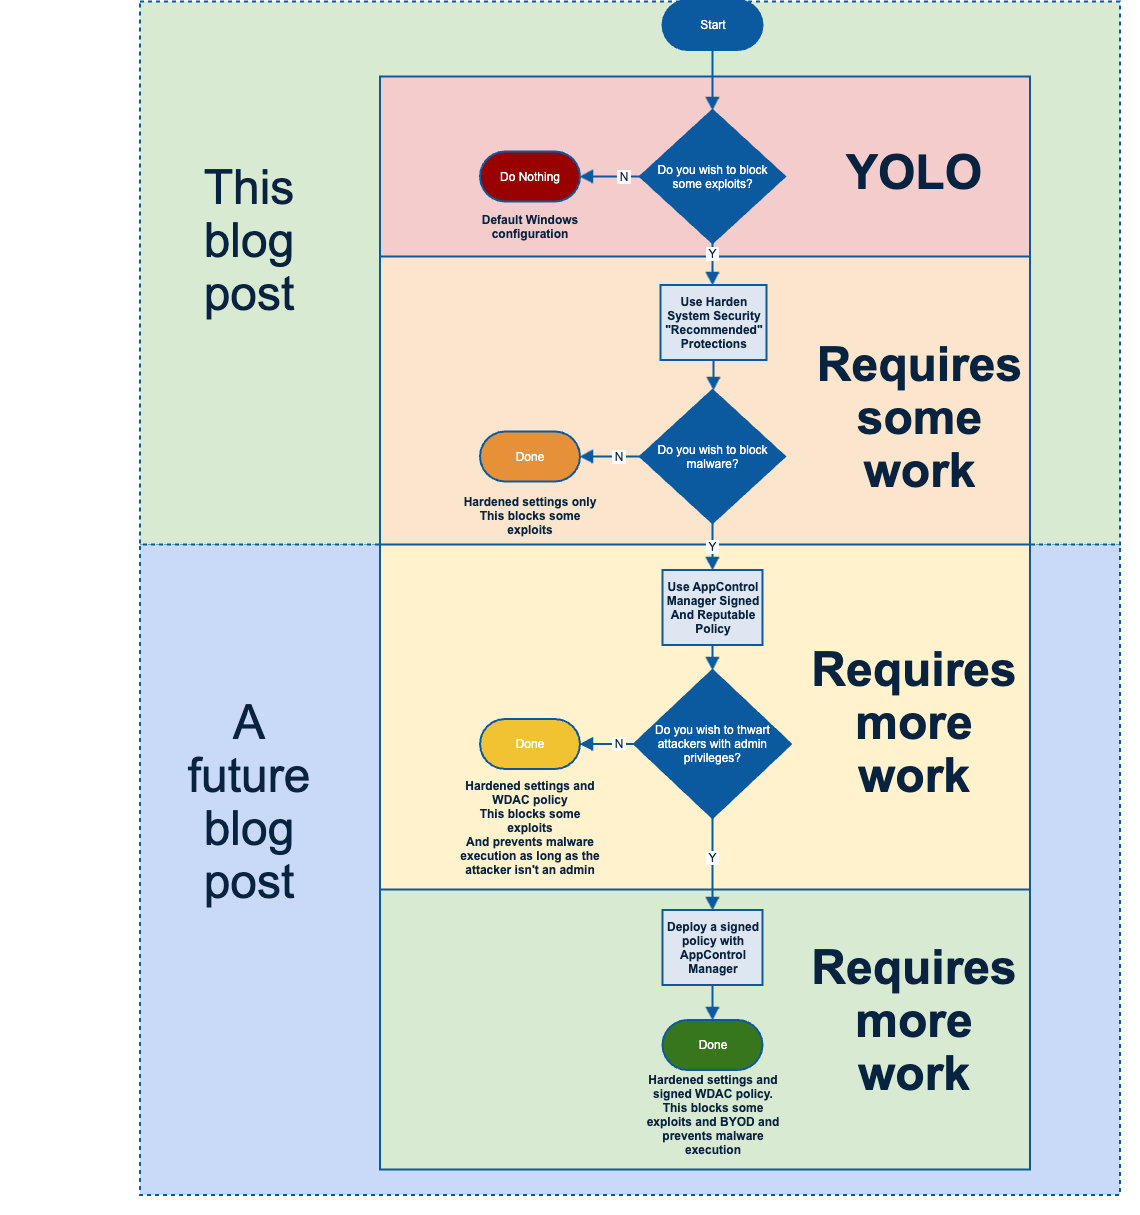
The bottom section here is the goal, as it blocks some exploits, prevents malware execution, and blocks all BYOD attacks, or “BYOVD” as is currently (yet incorrectly) used to describe this type of attack.
Back up your system / clone your system to a VM for testing
Hardening your system can have unexpected consequences. Given the vast amount of software out there, you might have a special snowflake of a system that may catastrophically fail to boot when hardened or have app control enabled. So let’s create a VM of your system so that we can try before we buy.
Back your system up
Ideally you already have an active bare-metal backup and restore process in place. If not, you might have some soul searching to do about your relationship with computers. Nonetheless, here are some backup options:
Free
- Acronis True Image for Western Digital (Must have a Western Digital hard drive)
- AOMEI Backupper Standard
- Easeus Todo Backup Free
Trial
All of these tools have the ability to:
- Create a live image of Windows while it is running
- Create a bootable rescue media ISO
- Boot from this rescue media to restore a backup to a clean VM, even from a NAS share
Create a backup of your system onto a USB 3 USB device or a NAS. Or to some other device that you are comfortable that your rescue media will be able to access.
Restore to a VM
To increase the chances of the VM booting properly, try to make the VM’s hardware as close to your real hardware. For example, if your real hardware has an NVMe storage device, then make your VM also have an NVMe for storage. Likewise, making the VM have at least as large an OS disk as your real hardware will make the cloning process easier, as otherwise you will be limited to backup and restore applications that can dynamically resize partition sizes on restore. If your VM properties are different enough from your real hardware, Windows may require special retooling to ensure that it boots on the new hardware. To create a VM of your system:
- Create a rescue media ISO using the backup software that you already use, or that you chose above.
- Boot your blank VM using the rescue media ISO.
- Restore your VM using the rescue media. If you backed up to a network share / NAS, then browse to the location of the backup. If you backed up to a USB storage device, ensure that your VM has USB 3 support for performance reasons and connect this device so that you can browse to your backup.
If all goes well, you’ll have a VM of the machine that you are using, where you can test any scenario out before deploying it to your bare metal system.
Even if you don’t go down the path of creating a VM of the system that you plan to lock down, you’ll at least want to have a full-system backup before proceeding with anything.
Harden System Security
The Harden System Security is a tool to apply Microsoft-recommended Windows hardening settings in a simplified manner.
Backing up current settings
Before applying any hardening settings, it is best to make a backup of the current settings that may be modified by hardening. In Harden System Security, click Protect on the left side, then System State and finally click Backup.
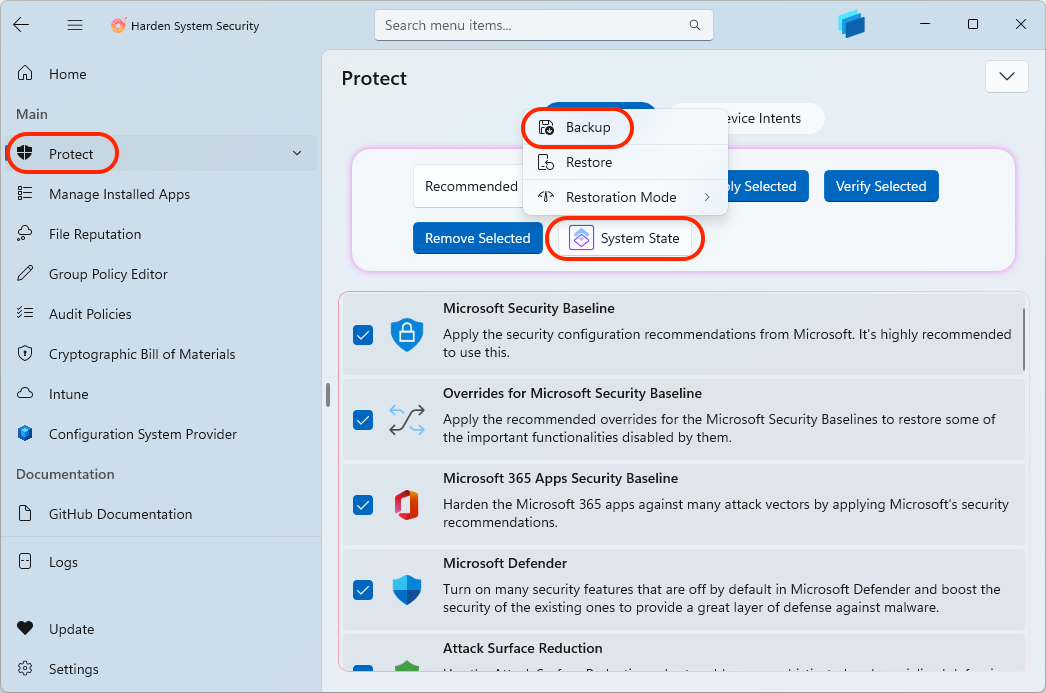
This will prompt you for where you’d like to save the JSON file that captures your current settings. Saved settings can be restored by using the Restore button.
Apply global Recommended hardening settings
The Microsoft Security Baseline protection is the first of several protection categories in the available list of hardening options. From Microsoft:
Even though Windows and Windows Server are designed to be secure out-of-the-box, many organizations still want more granular control over their security configurations. To navigate the large number of controls, organizations need guidance on configuring various security features. Microsoft provides this guidance in the form of security baselines.
Harden System Security applies the Microsoft-recommended security baseline for your platform, as well as several other categories of hardening settings.
NOTE: Be sure to read through each of the troubleshooting quirks in the next section of this blog post below before applying hardening settings. Especially the RDP item, if you use RDP to connect to the system that you are hardening.
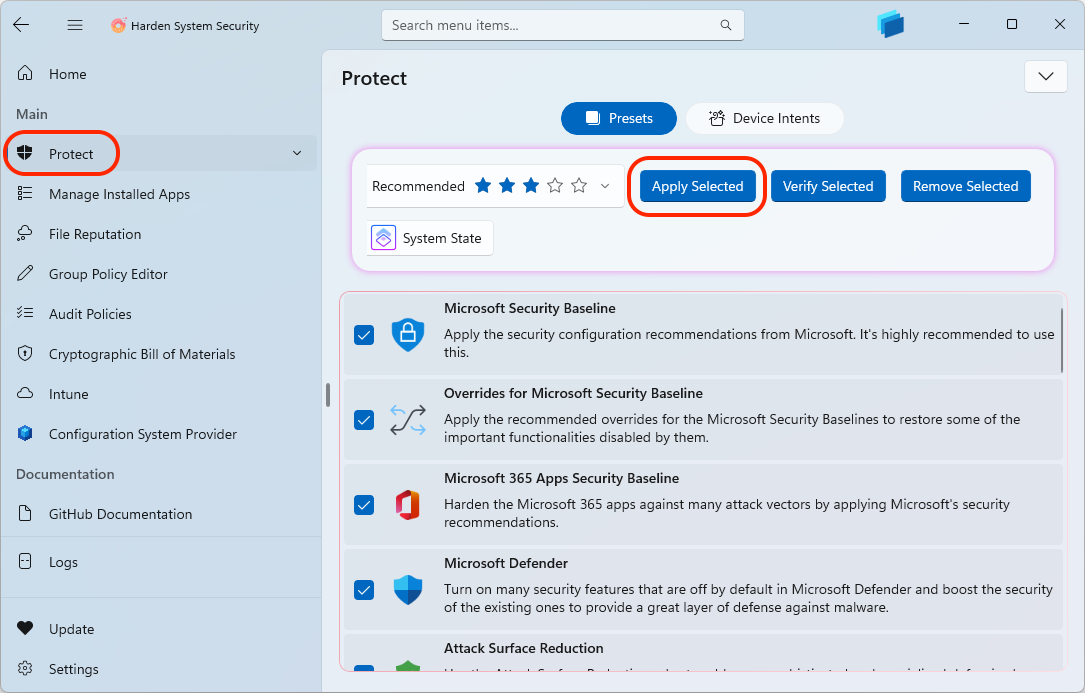
After clicking the Protect link on the left side, you will be taken to a list of protections that you’d like to apply. To apply the recommended level (Good protection, lesser risk of breaking things), just leave the drop down at the Recommended three-star setting, and click the Apply Selected button next to it.
If your use case requires other than default hardening settings, you may click the Recommended item drop-down.
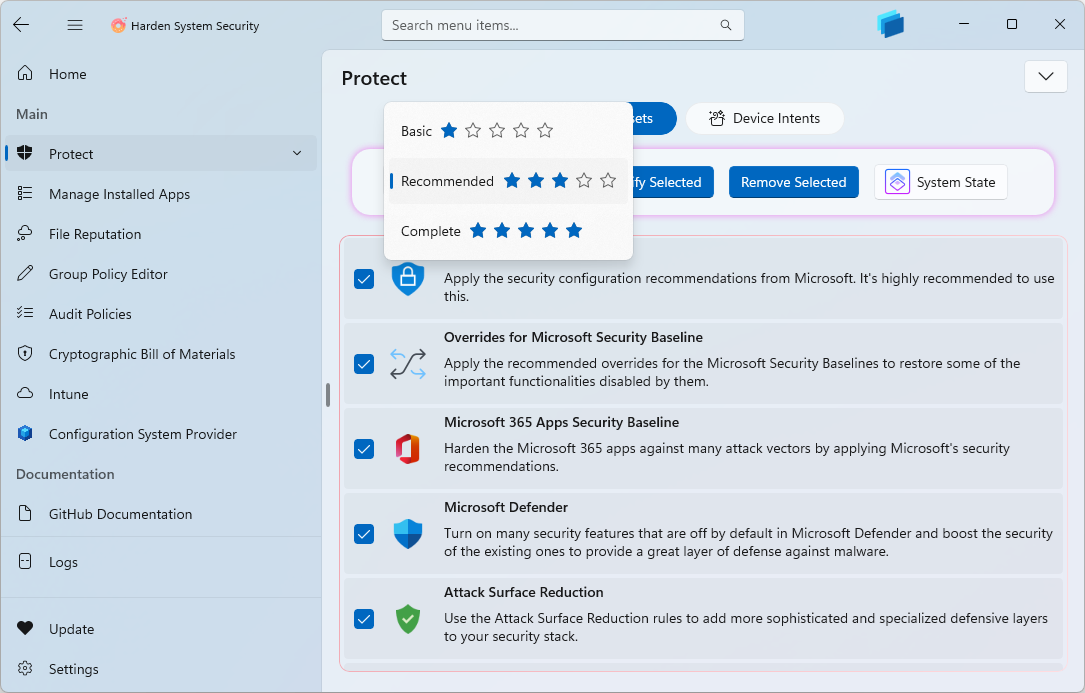
Basic: Less intrusive, but at the same time less protection.
Recommended: Default recommended hardening.
Complete: More intrusive, but more complete hardening.
Troubleshooting quirks
Once hardened, some things in Windows may behave differently than you’re used to. Here are a few differences that we noticed.
Ability to RDP to a hardened system
One thing we noticed pretty quickly was that we could no longer connect using RDP to a hardened Windows system. In fact, if the system being hardened is currently being accessed via RDP, then this connection may be broken immediately upon application of the hardening settings.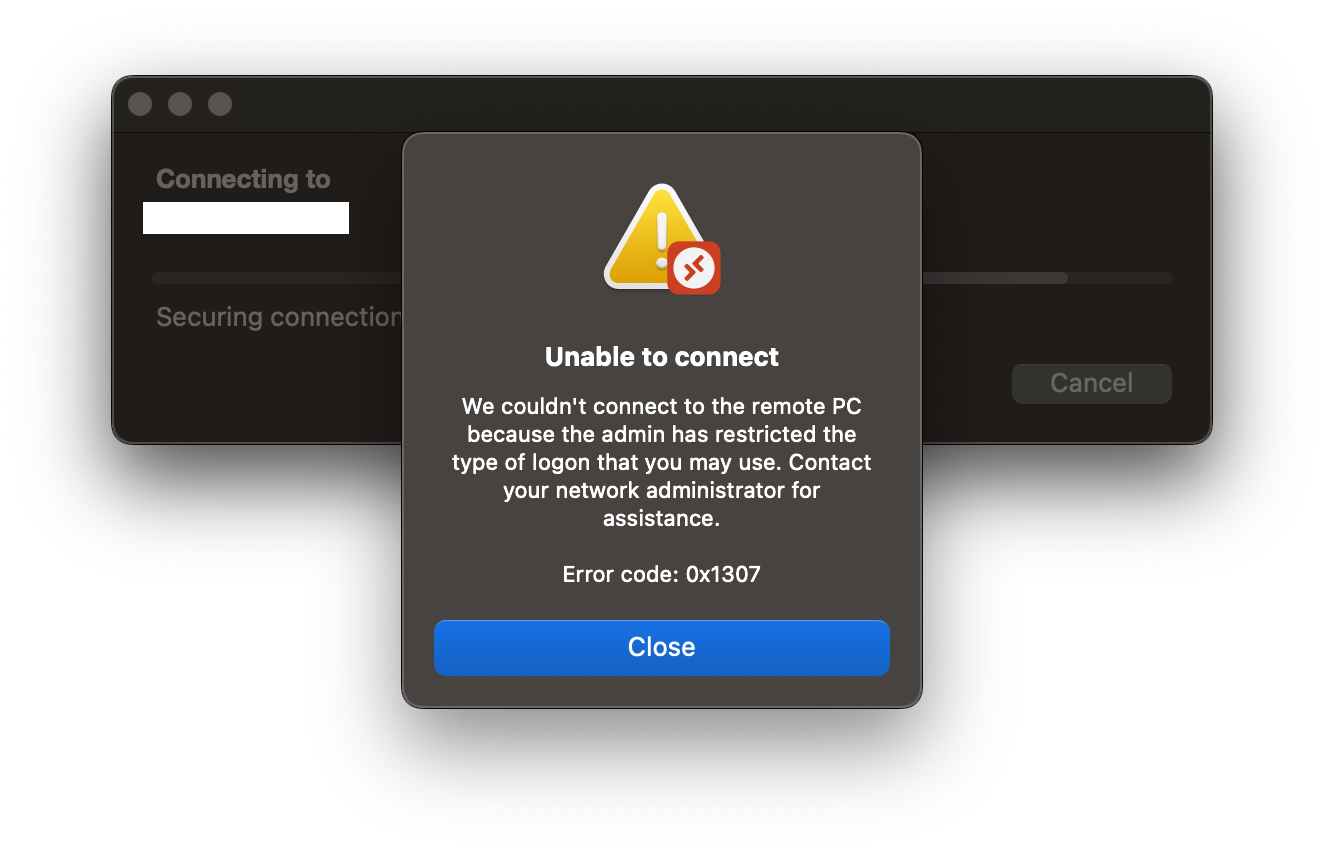
Required: Undo “Deny access to this computer from the network”
The core feature blocking remote RDP connections is the SeDenyNetworkLogonRight policy in the Microsoft Security Baseline.
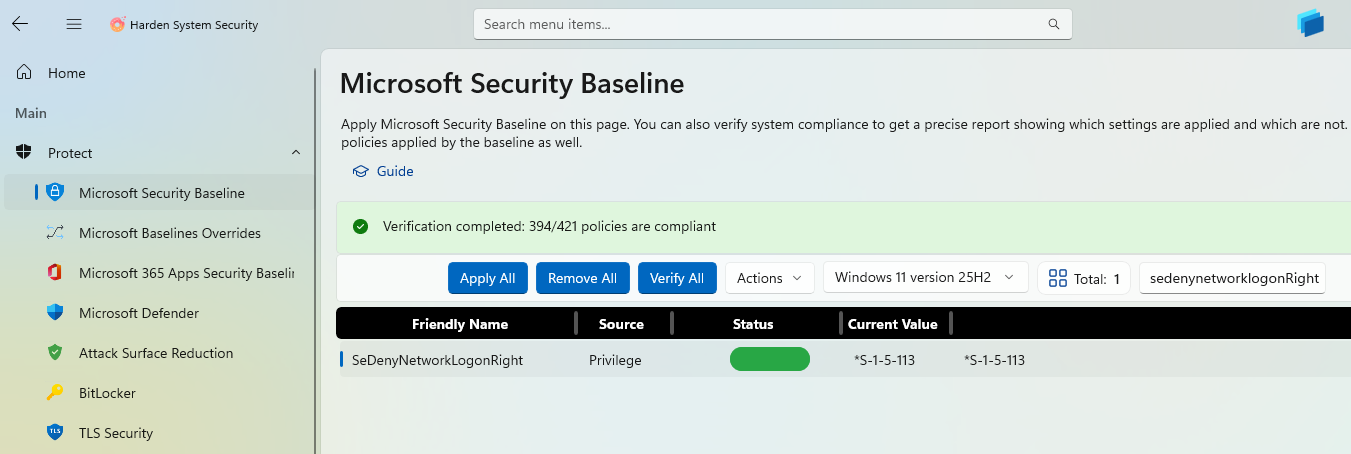
With this policy set, all users in the Local Account group (S-1-5-113) are denied the ability to connect with RDP. To undo this change, we can use gpedit.msc to edit the current group policy.
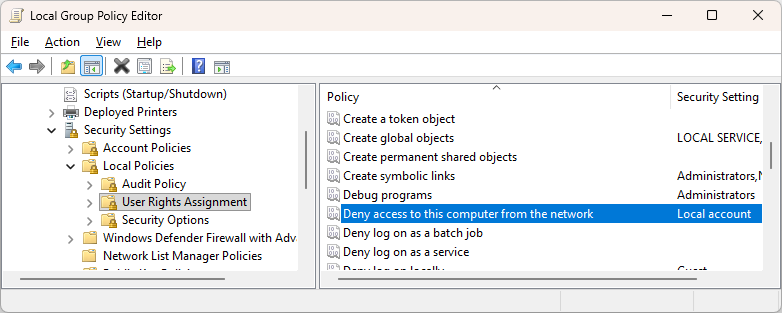
In Computer Configuration\Windows Settings\Security Settings\Local Policies\User Rights Assignment, we need to find and double-click Deny access to this computer from the network.
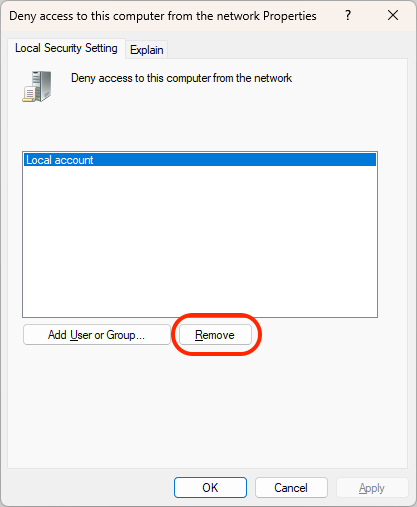
With Local account selected, click the Remove button.
If set: Undo “Deny log on through Remote Desktop Services”
While “Deny access to this computer from the network” prevents the rdp client from connecting at all, the “Deny log on through Remote Desktop Services” policy prevents the user from logging in properly.

Similar to the above policy, browse to Computer Configuration\Windows Settings\Security Settings\Local Policies\User Rights Assignment and find and double-click the Deny log on through Remote Desktop Services policy.
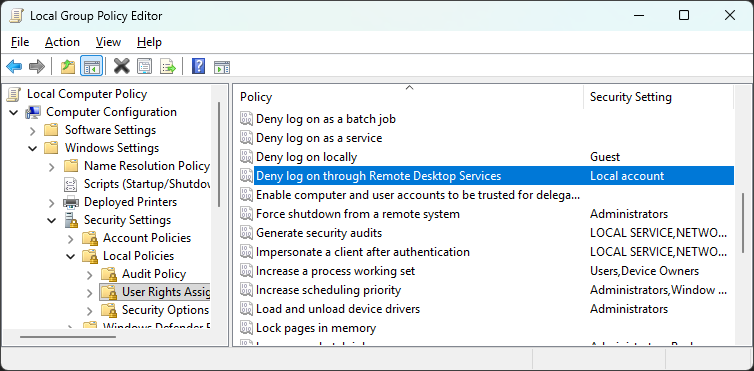
You may note that Local account is here. If present, this prevents any local account from logging in with RDP. Remove it if it is there. If it is not present, then no action is required here.
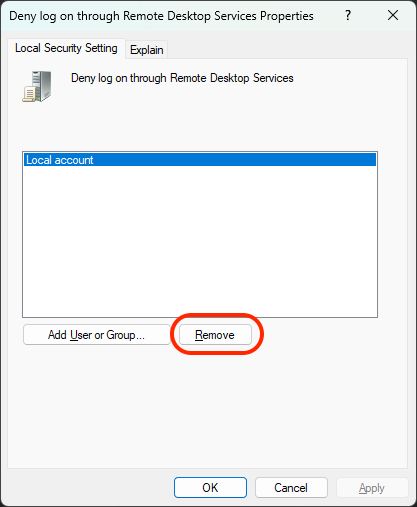
At this point you should be able to connect to the computer via RDP again.
NAS / network share connectivity
One thing we noticed after hardening one of our Windows machines was that we could no longer connect to our NAS. Through a lot of troubleshooting, we realized that we could change the hardening rules to not require SMB3 and that allowed me to connect again.
The simpler solution:
Enable SMB3 on the NAS. On this old Synology system, this involves:
- In the Control Panel, click
File Services→SMB, and then click theAdvancedtab.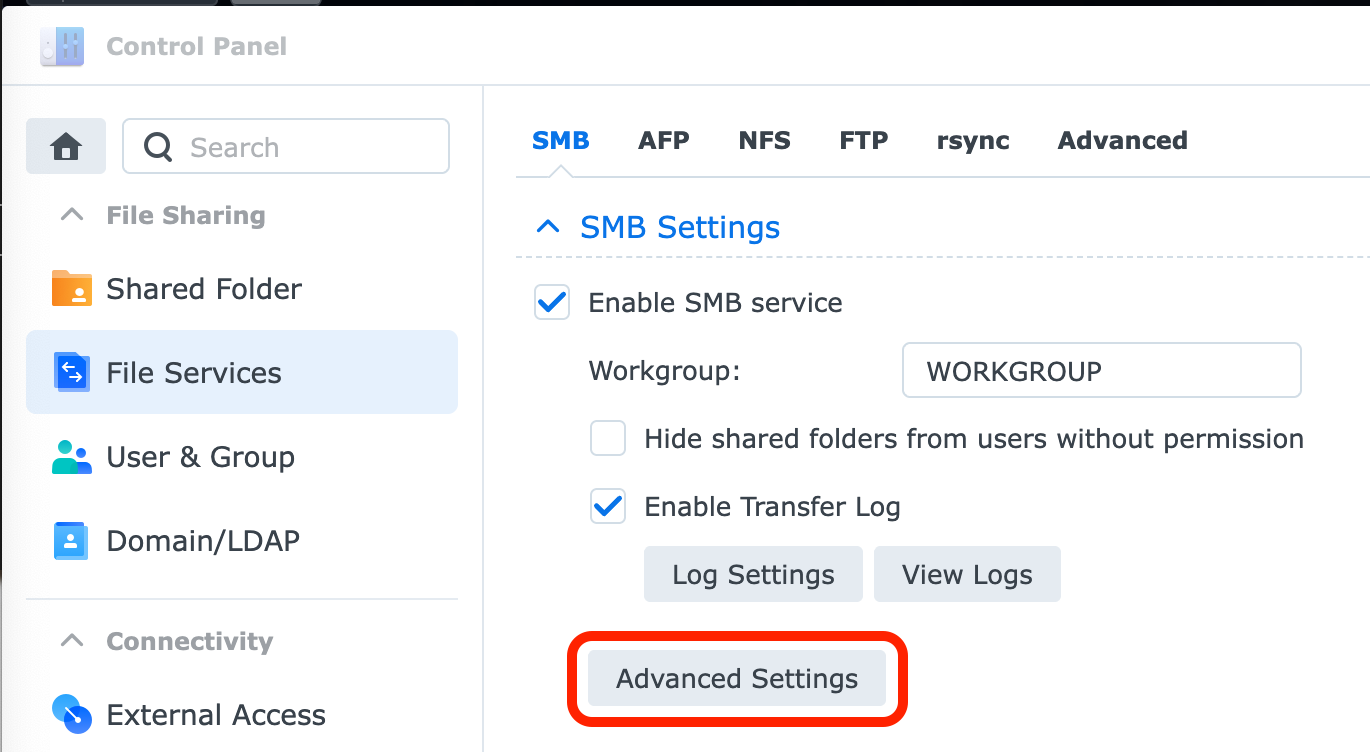
- In the Advanced Settings page for SMB, ensure that SMB3 is selected in the Maximum SMB protocol field.
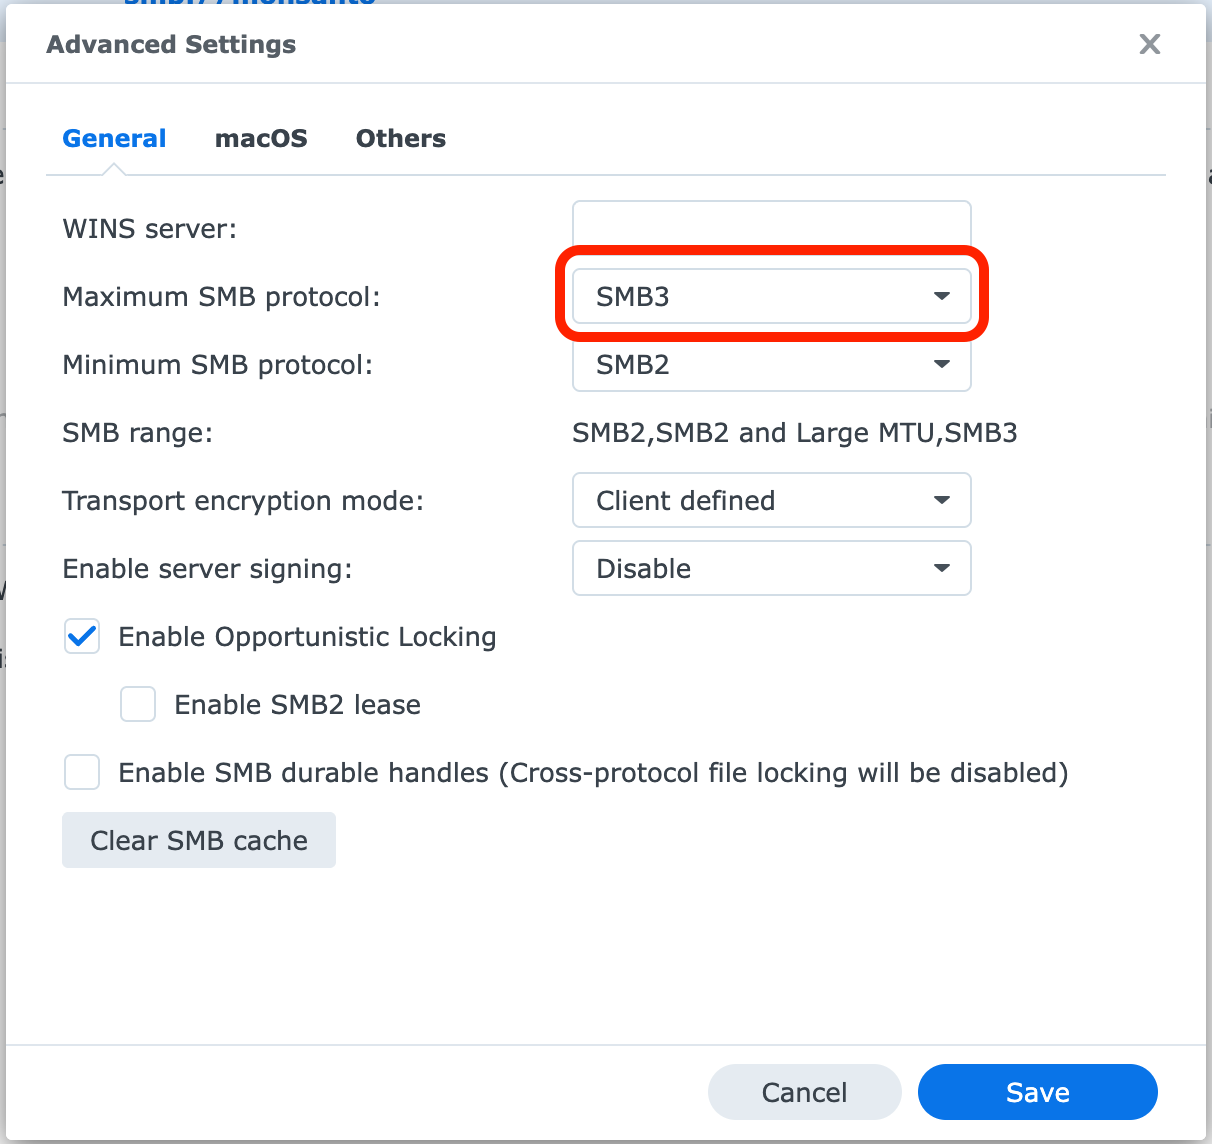
This NAS is an 11-year-old Synology unit. Which did not support SMB3 when it shipped. And the various firmware updates along the years did not touch the SMB settings. So while it was running a current OS version, it had settings that reflected how things were 11 years ago.
Enabling SMB3 on the NAS allowed our hardened systems to connect once again, without sacrificing hardening settings on the client. For other NAS products that are experiencing problems after hardening, please refer to your vendor’s documentation to make sure that SMB3 is supported.
Disabling password expirations
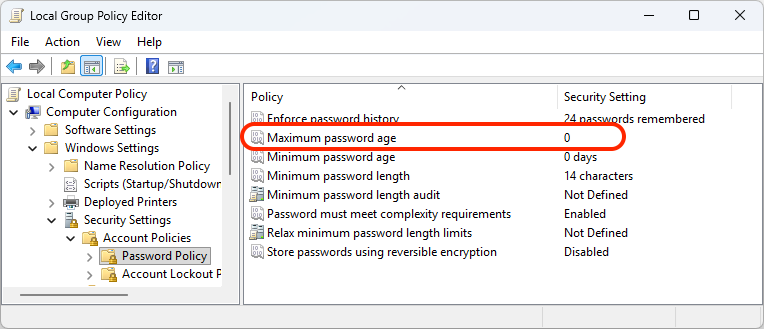
We all know that forcing scheduled password expirations does not improve security. However, Microsoft’s security baselines recommend that passwords expire every 42 days for some reason. To undo this hardening change, go to gpedit.msc and go to the Password Policy section.
Mandatory ASLR breaks some UPX packed executables
Malware authors love to use UPX and friends to pack their malware. So in some ways, breaking UPX-packed binaries doesn’t seem to be that bad of an idea. On the other hand, some legitimate software developers also use UPX, and potentially a version that breaks with mandatory ASLR.
In our testing, the RegCool 1.361 installer silently fails after it launches setup.exe with privileges. setup.exe in this RegCool version is packed with a misbehaving version of UPX, and as such it will simply terminate when UPX attempts to do something that breaks with mandatory ASLR.
In this case, simply updating to a newer version of RegCool solves the problem, as it uses a more modern version of UPX that is not as fragile.
Mandatory ASLR breaks Cygwin’s fork
Mandatory ASLR is a great exploit protection that we have been recommending for over 14 years. And as this old blog post suggests, sometimes software breaks when ASLR is forced.
In a case that might affect people with up-to-date software is Cygwin. Cygwin’s implementation of fork requires that the child process have the same memory layout as the parent. As such, on a system with Mandatory ASLR enabled, we might see behavior like this:
$ find . -name "*.txt"

0 [main] bash 927 child_info_fork::abort: \??\c:\cygwin64\bin\cygiconv-2.dll: Loaded to different address: parent(0x10E0000) != child(0x1070000)

bash: fork: retry: Resource temporarily unavailable

0 [main] bash 928 child_info_fork::abort: \??\c:\cygwin64\bin\cygiconv-2.dll: Loaded to different address: parent(0x10E0000) != child(0x1030000)

bash: fork: retry: Resource temporarily unavailable

0 [main] bash 929 child_info_fork::abort: \??\c:\cygwin64\bin\cygiconv-2.dll: Loaded to different address: parent(0x10E0000) != child(0x11E0000)
We don’t need to disable system-wide mandatory ASLR to avoid this problem.
Because anything in Cygwin that uses fork will be broken by Mandatory ASLR, we can add exclusions for all of the Cygwin executables using a privileged PowerShell terminal:
$root = 'C:\cygwin64'
Get-ChildItem -Path $root -Filter *.exe -File -Recurse -ErrorAction SilentlyContinue |
  ForEach-Object {
    try {
      Set-ProcessMitigation -Name $_.FullName -Disable ForceRelocateImages -ErrorAction Stop
    } catch {
      # Ignore failures setting mitigations
    }
  }
Obviously, modify C:\cygwin64 to the location where you have Cygwin installed.
Attack Surface Reduction blocks Cygwin’s find.exe
On a system that has hardening settings enabled, you may find that Attack Surface Reduction (ASR) blocks Cygwin’s find.exe.
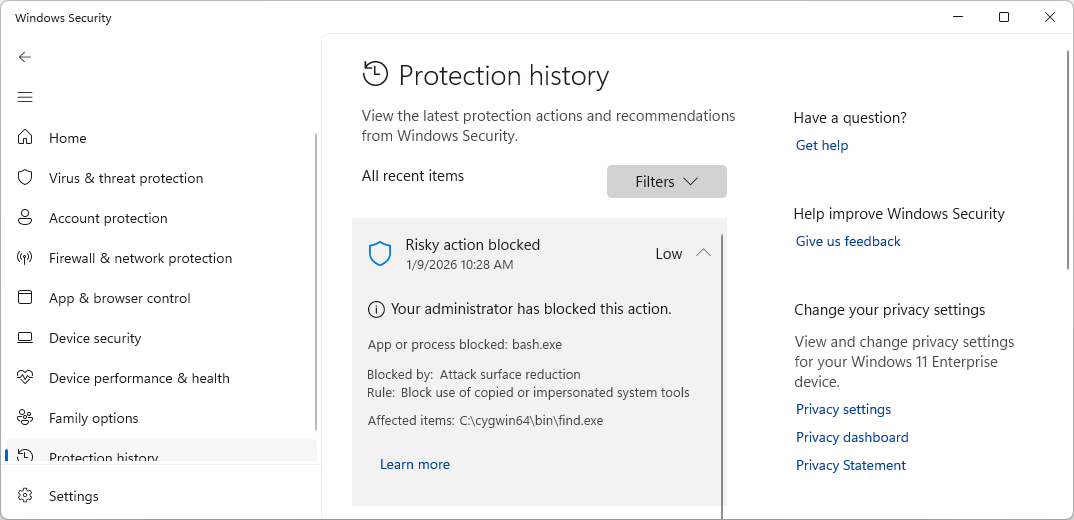
While yes, find.exe is indeed the same name as a program that comes with Windows, and C:\cygwin64\bin is indeed not the location that the Windows find.exe should be, we know that this is not an impersonation of the Windows find.exe nor is it the Windows find.exe that has been moved from where it is supposed to live. We can make an exclusion for this in an elevated PowerShell session:
Add-MpPreference -AttackSurfaceReductionOnlyExclusions `
  "C:\cygwin64\bin\find.exe"
VMware guest crash upon Machine inactivity limit reached for 3D-enabled guests
This is a problem that will only show up in certain circumstances with older (buggier) Intel video drivers, but is perhaps worth mentioning regardless. One of the hardening policies enabled is Interactive logon: Machine inactivity limit. With this policy set, Windows will automatically lock the session after the specified timeout.
At least with the native VMware hypervisor is used, when VMware Workstation has VMs that use 3D acceleration are running, this locking action tickles a bug in VMware that will cause the VM to crash.
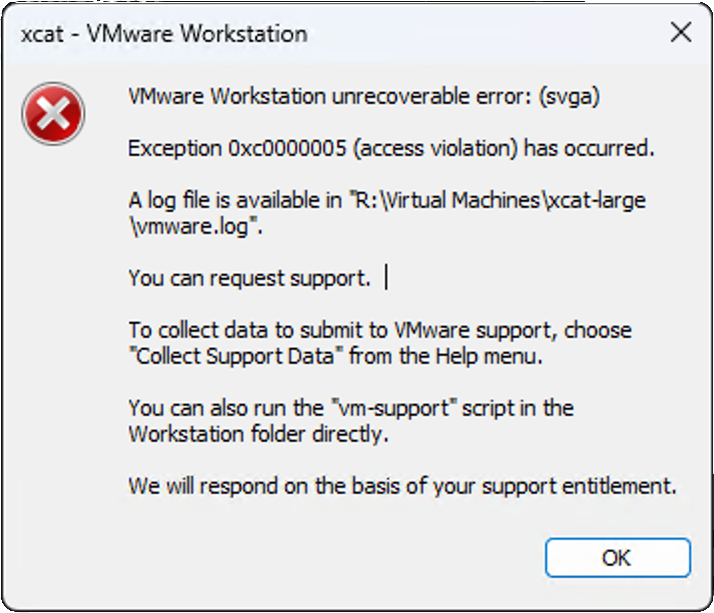
Presumably during this auto locking, the video graphics device goes away. At least temporarily. But in a way that VMware does not recover from.
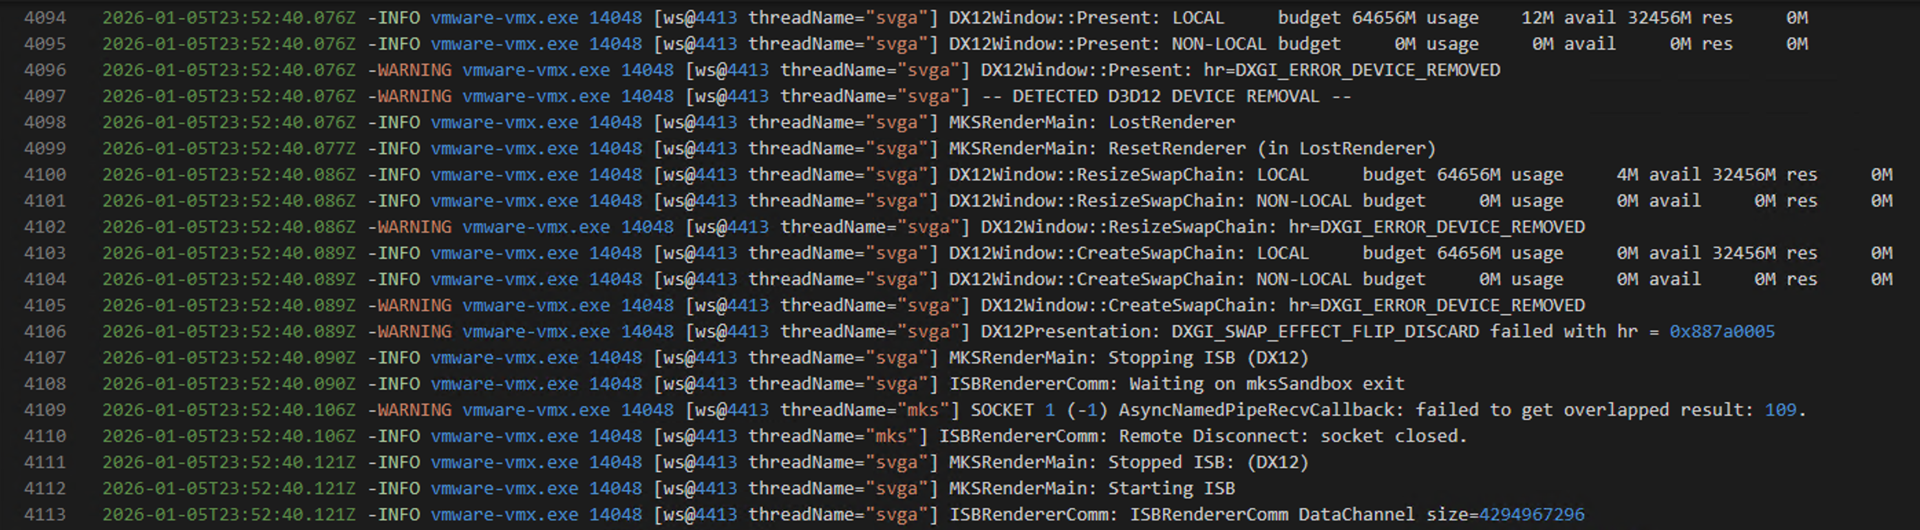
Looking at the vmware.log file, we can see a DETECTED D3D12 DEVICE REMOVAL error before the badness happens. We can even load the .dmp file in a debugger to see the crash details:
STACK_TEXT:

0000004f`cceff410 00007ff9`9ccb8b24     : 00000000`00000000 0000004f`cceff730 00000246`80b69400 00007ffa`0c583191 : D3D12Core!CLayeredObject::CContainedObject::AddRef+0xe

0000004f`cceff440 00007ff9`9ccab315     : 00000000`0000b100 0000004f`cceff730 00000246`80b69400 00000000`00000000 : D3D12Core!D3D12CoreCreateDevice+0x2c0

0000004f`cceff6c0 00007ff9`9ccab138     : 00000000`00000000 00000000`0000b100 00007ff6`9409f188 00007ffa`053e05d3 : D3D12Core!D3D12ValidateAndCreateDeviceImpl+0x1d1

0000004f`cceff750 00007ffa`053d82a3     : 00000000`00000000 00000000`0000b100 00000000`00000000 00000000`00000000 : D3D12Core!D3D12ValidateAndCreateDevice+0x38

0000004f`cceff7a0 00007ffa`053d70eb     : 00000000`00000000 00000246`80b69400 00000000`0000b100 00000000`00000002 : D3D12!D3D12CreateDeviceImpl+0x93

0000004f`cceff800 00007ff6`937e760c     : 00000246`80b27260 0000004f`cceff940 00007ffa`07703e90 00000000`00000000 : D3D12!D3D12CreateDevice+0x3b

0000004f`cceff840 00007ff6`93734219     : 00000000`000000b0 00000246`80b27260 00000246`80b27260 00000000`00012372 : vmware_vmx+0x26760c

0000004f`cceffa80 00007ff6`93731a99     : 00000246`80b27260 00000000`00000000 00000000`00000fe9 00000000`000003e5 : vmware_vmx+0x1b4219

0000004f`cceffab0 00007ff6`936f7899     : 00000000`00000003 ffffffff`ffffffff 00007ff6`94048bb4 00007ff6`94048238 : vmware_vmx+0x1b1a99

0000004f`cceffb40 00007ff6`936f8172     : 00000000`00000007 0000004f`cceffbd3 00000000`00000003 00000000`00000000 : vmware_vmx+0x177899

0000004f`cceffbb0 00007ff6`936f3516     : 00000000`00000490 00000000`00000000 00000000`00000001 00000000`00000001 : vmware_vmx+0x178172

0000004f`cceffc00 00007ff6`936f421f     : 00007ff6`94048238 00000000`00000001 00007ff6`94048238 00007ff6`94048238 : vmware_vmx+0x173516

0000004f`cceffc30 00007ff6`936cab7c     : 00000000`00000490 00000000`00000000 00000000`00000000 00000000`00000100 : vmware_vmx+0x17421f

0000004f`cceffc80 00007ff6`93dd0070     : 00000000`00000000 00000000`00000000 00000000`00000000 00000000`00000000 : vmware_vmx+0x14ab7c

0000004f`cceffcc0 00007ffa`0d72e8d7     : 00000000`00000000 00000000`00000000 00000000`00000000 00000000`00000000 : vmware_vmx+0x850070

0000004f`cceffd50 00007ffa`0edec53c     : 00000000`00000000 00000000`00000000 000004f0`fffffb30 000004d0`fffffb30 : kernel32!BaseThreadInitThunk+0x17

0000004f`cceffd80 00000000`00000000     : 00000000`00000000 00000000`00000000 00000000`00000000 00000000`00000000 : ntdll!RtlUserThreadStart+0x2c
To avoid this problem, set the Computer Configuration\Windows Settings\Security Settings\Local Policies\Security Options\Interactive logon: Machine inactivity limit value in gpedit.msc to 0
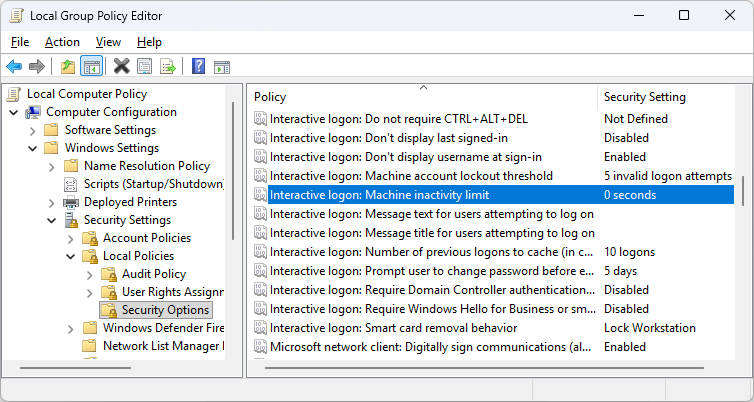
To SOLVE the problem, update the Intel graphics driver.
Remember, it’s bugs all the way down. Our goal is to avoid as many as we can here.
UAC
While not a problem, one thing that is easily noticeable after the hardening is the UAC Credential UI prompt. Before hardening, if your admin account is a local account, Windows will automatically populate the User name field with an admin account on the system. However, after hardening, it will be up to you to remember what the admin account name is.
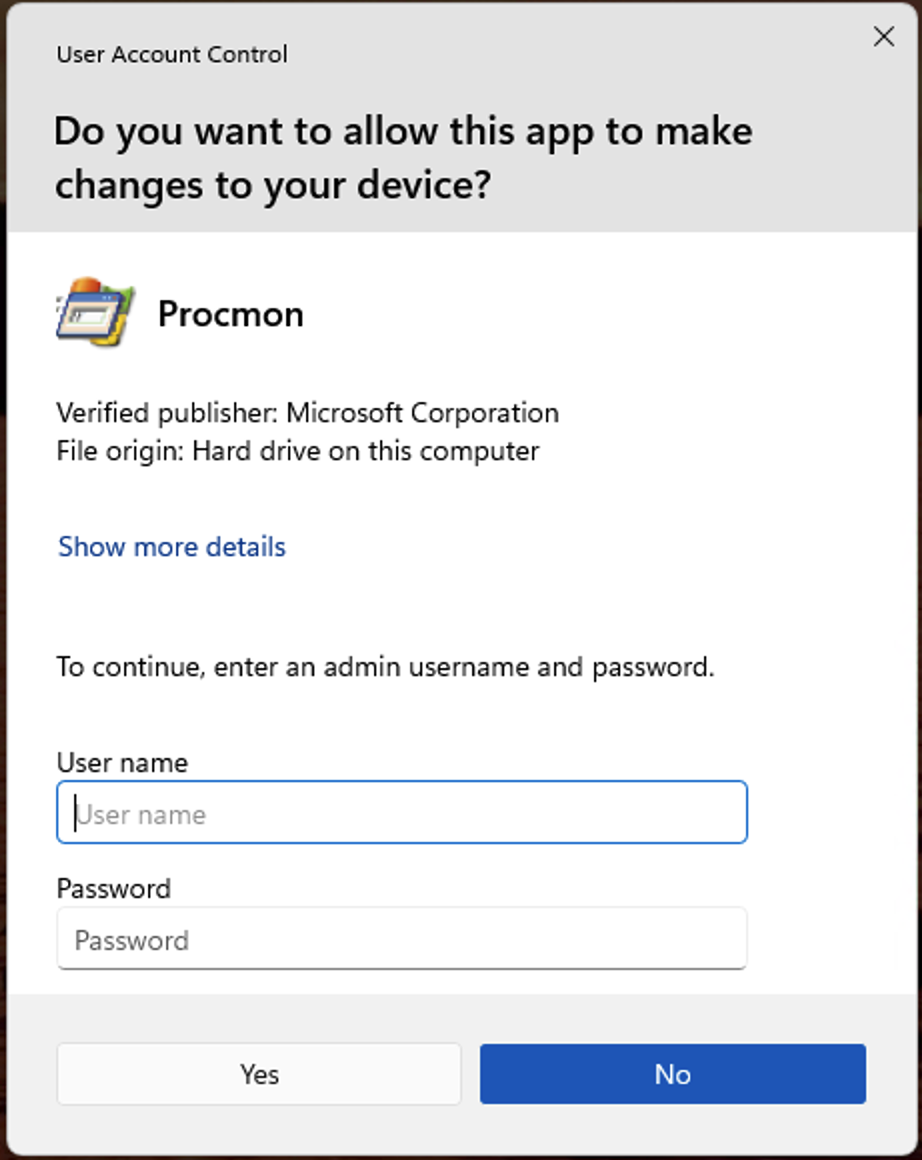
If you’re not used to seeing the UAC Credential UI, then you must be one of those types who logs into Windows as an admin user. Interesting choice to harden a system that you abuse in this way…
Protected folder access
After hardening windows with Harden System Security, you may find yourself in a place where some apps are not behaving as expected.
Sadly, we were unable to reproduce the situation, but on one system we were unable to successfully execute the Paragon Hard Disk Manager installer. It would go to about 50% complete, start over, and that would repeat a few times until the installer gave up.
In Windows Security → Virus and threat protection → Protection history, we noticed the smoking gun:
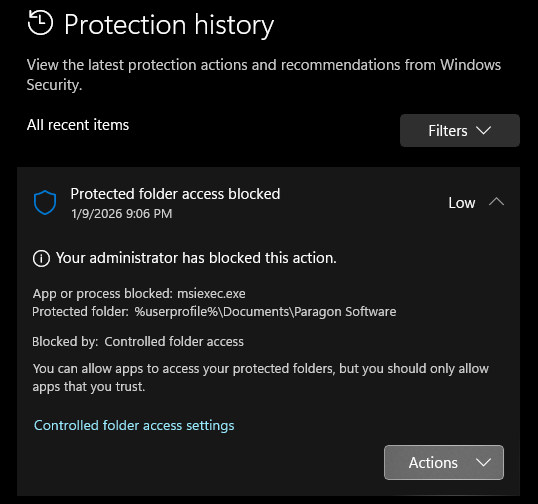
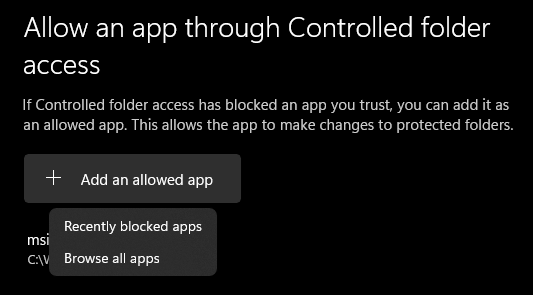
Somehow with this particular system, the software installer attempted to run msiexec.exe in a protected (Documents) folder. If we look at the Controlled folder access settings in Windows, we can see that this is part of ransomware protection.
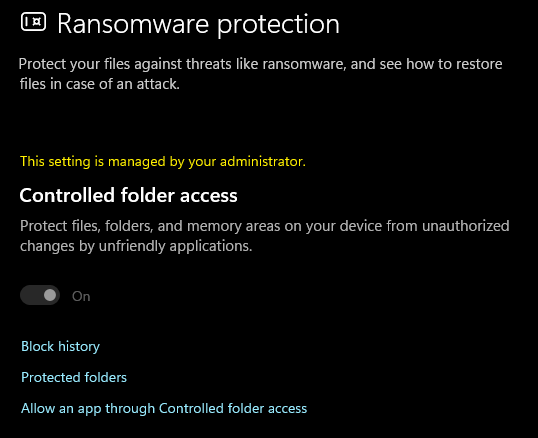
Here we can allow an app through the Controlled folder access protection.
If we test a little more about what is protected about our Documents folder, we can see that we can’t even run mkdir in a cmd.exe prompt.
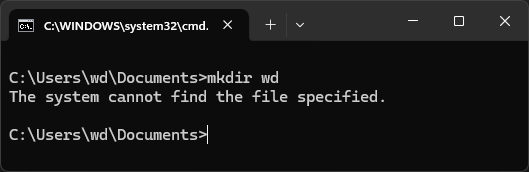
The error is very much not useful. However if we go back to Protection History in Windows Security, we can see that our mkdir was blocked via Protected folder access ransomware protection.
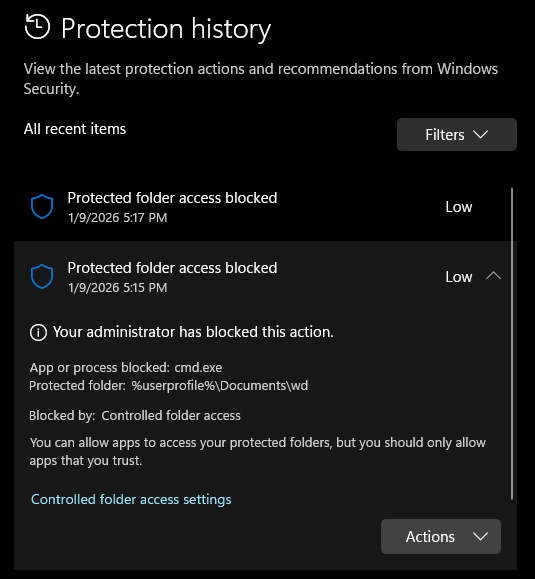
It’s worth noting that a directory can be created within Documents with Windows Explorer just fine. Presumably Microsoft has come up with a list of behaviors that are likely to be used with ransomware attacks, and these protections will be enabled in a hardened Windows system.
Allowing an SMB server
Shortly after discovering that VMware HGFS is about twice as slow as an SMB connection, we set up one of our machines to connect to my host’s filesystem via SMB instead of HGFS. This was done with an account called smbvm
After hardening, this SMB connection failed to connect. This change was due to two hardening settings:
Firewall blocking of SMB traffic
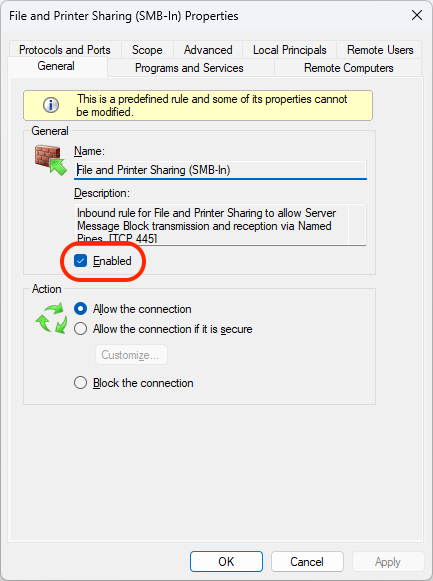
If we look at the Windows Defender with Advanced Security app, we can see that the SMB-In connections have No for Enabled after hardening. This means that we no longer allow incoming SMB connections at the firewall layer.
We can change this by configuring the firewall rule for the network in question (Private, Domain, or Public) and tick the Enabled box:
Explicit allowing of our SMB account
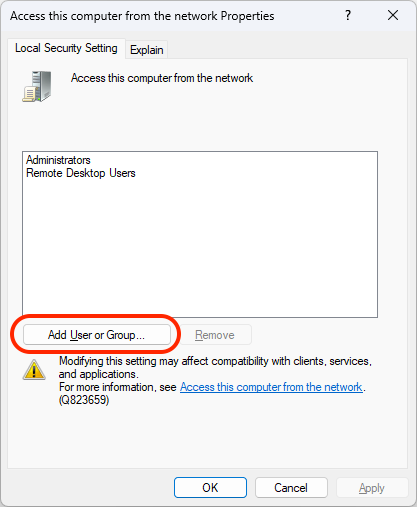
We had created a specific account for the use of SMB called smbvm. However, this account isn’t part of a group that would otherwise allow SMB connections. In gpedit.msc go to:
Computer Configuration\Windows Settings\Security Settings\Local Policies\User Rights Assignment\Access this computer from the network
Add the account that you need to access the SMB server by clicking Add User or Group and add the user that you need.
Deferring Windows Updates
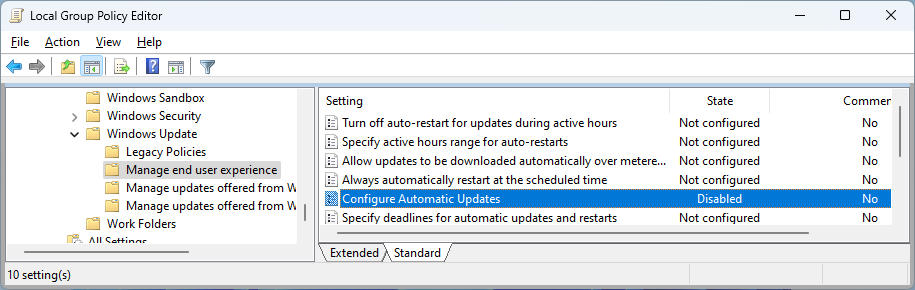
We security professionals know when we want to install Patch Tuesday updates. If you’ve configured this policy (Open the Manage end user experience folder in the path:Computer Configuration > Administrative Templates > Windows Components > Windows Update) to put yourself in control, you’ll probably want to do it again after hardening.
Disabling HVCI
Due to the fact that the way that VMware Workstation uses WHP (what VMware Workstation uses on systems with HVCI enabled) does not supported nested virtualization, those of us grandfathered into using VMware probably have a system that has HVCI disabled to ensure that the VMware hypervisor is used instead of WHP.
This is a dilemma for systems that want their system to be secure as possible and also have VMware VMs that use nested virtualization (e.g. a Windows system with VBS).
In our case, our ability to continue to use VMware probably outweighs the protections that HVCI gives us.
Two tasks are required to bring an HVCI-off system back to that state after running the Harden System Security tool. And do note that this process requires physical access to the system. Or at least the ability to interact with the screen before Windows boots.
Disable group policy for Turn On Virtualization Based Security
In gpedit.msc, go to: Computer Configuration -> Administrative Templates -> System -> Device Guard -> Turn On Virtualization Based Security
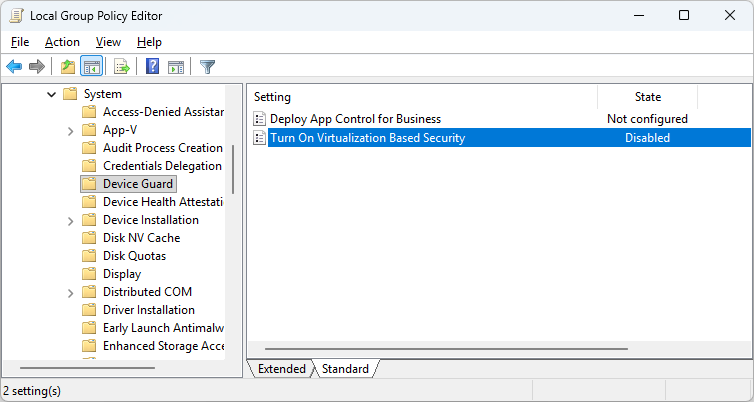
Set this to Disabled
Disable the Optional Windows features that use HVCI
In Harden System Security, go to Protect → Optional Windows Features
Click Verify Recommendations to populate the list with the features that are to be configured.
Click the search box and type in part of the following items to find them:
Microsoft-Hyper-V-All

If already configured, the tool will show Installed for the State field. Otherwise, it will say Staged if it’s ready to be configured.
Whichever the case, simply click the Disable button to disable the component.
Containers-DisposableClientVM

If already configured, the tool will show Installed for the State field. Otherwise, it will say Staged if it’s ready to be configured.
Whichever the case, simply click the Disable button to disable the component.
Use the DGreadiness tool to disable DeviceGuard
Get the Device Guard readiness tool: https://www.microsoft.com/en-us/download/details.aspx?id=53337
Extract this ZIP to a directory you can easily get to with an Admin-privileged CMD prompt. Then run:
powershell.exe -ExecutionPolicy Bypass -File DG_Readiness_Tool_v3.6.ps1 -Disable
Reboot the computer while you are physically at the keyboard/screen. When the system reboots, you’ll get a pair of prompts:
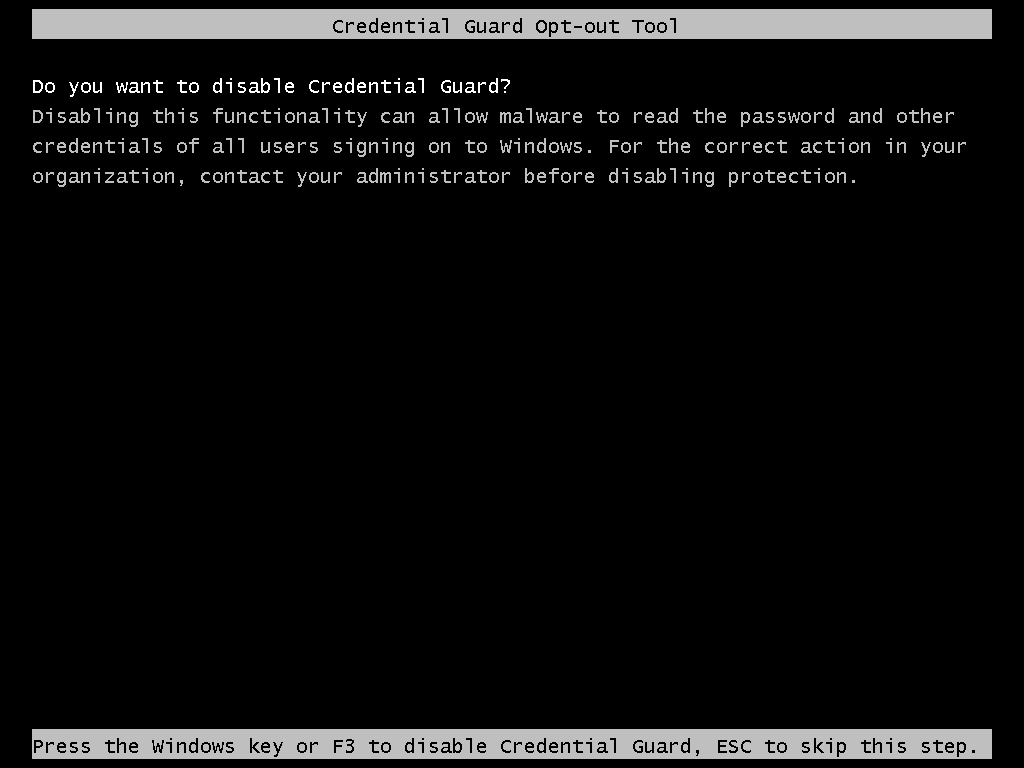
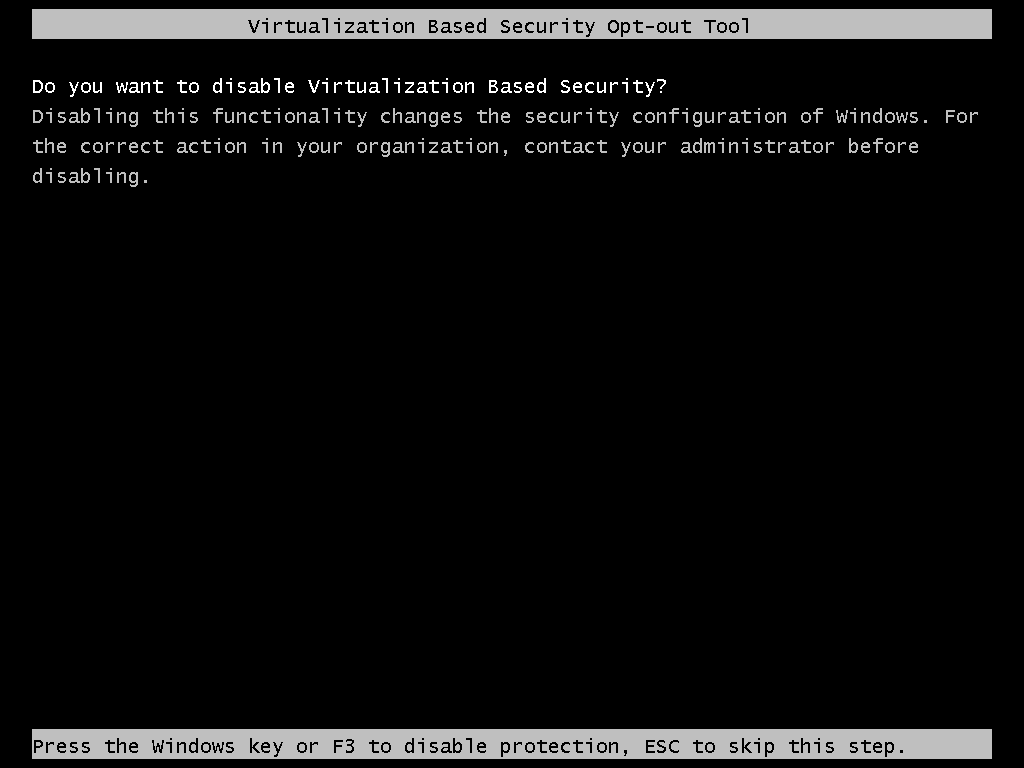
For each of these prompts, hit the F3 key to disable the two features that use HVCI.
The reason for physical presence is, like with signed WDAC policies, the security features are designed so that they cannot be disabled by a remote attacker.
Effectiveness
We can test a hardened system against stock Windows with real-world exploits, such as the one for CVE-2025-60710, which existed publicly for an entire month before Microsoft fixed the vulnerability.
Stock Windows:
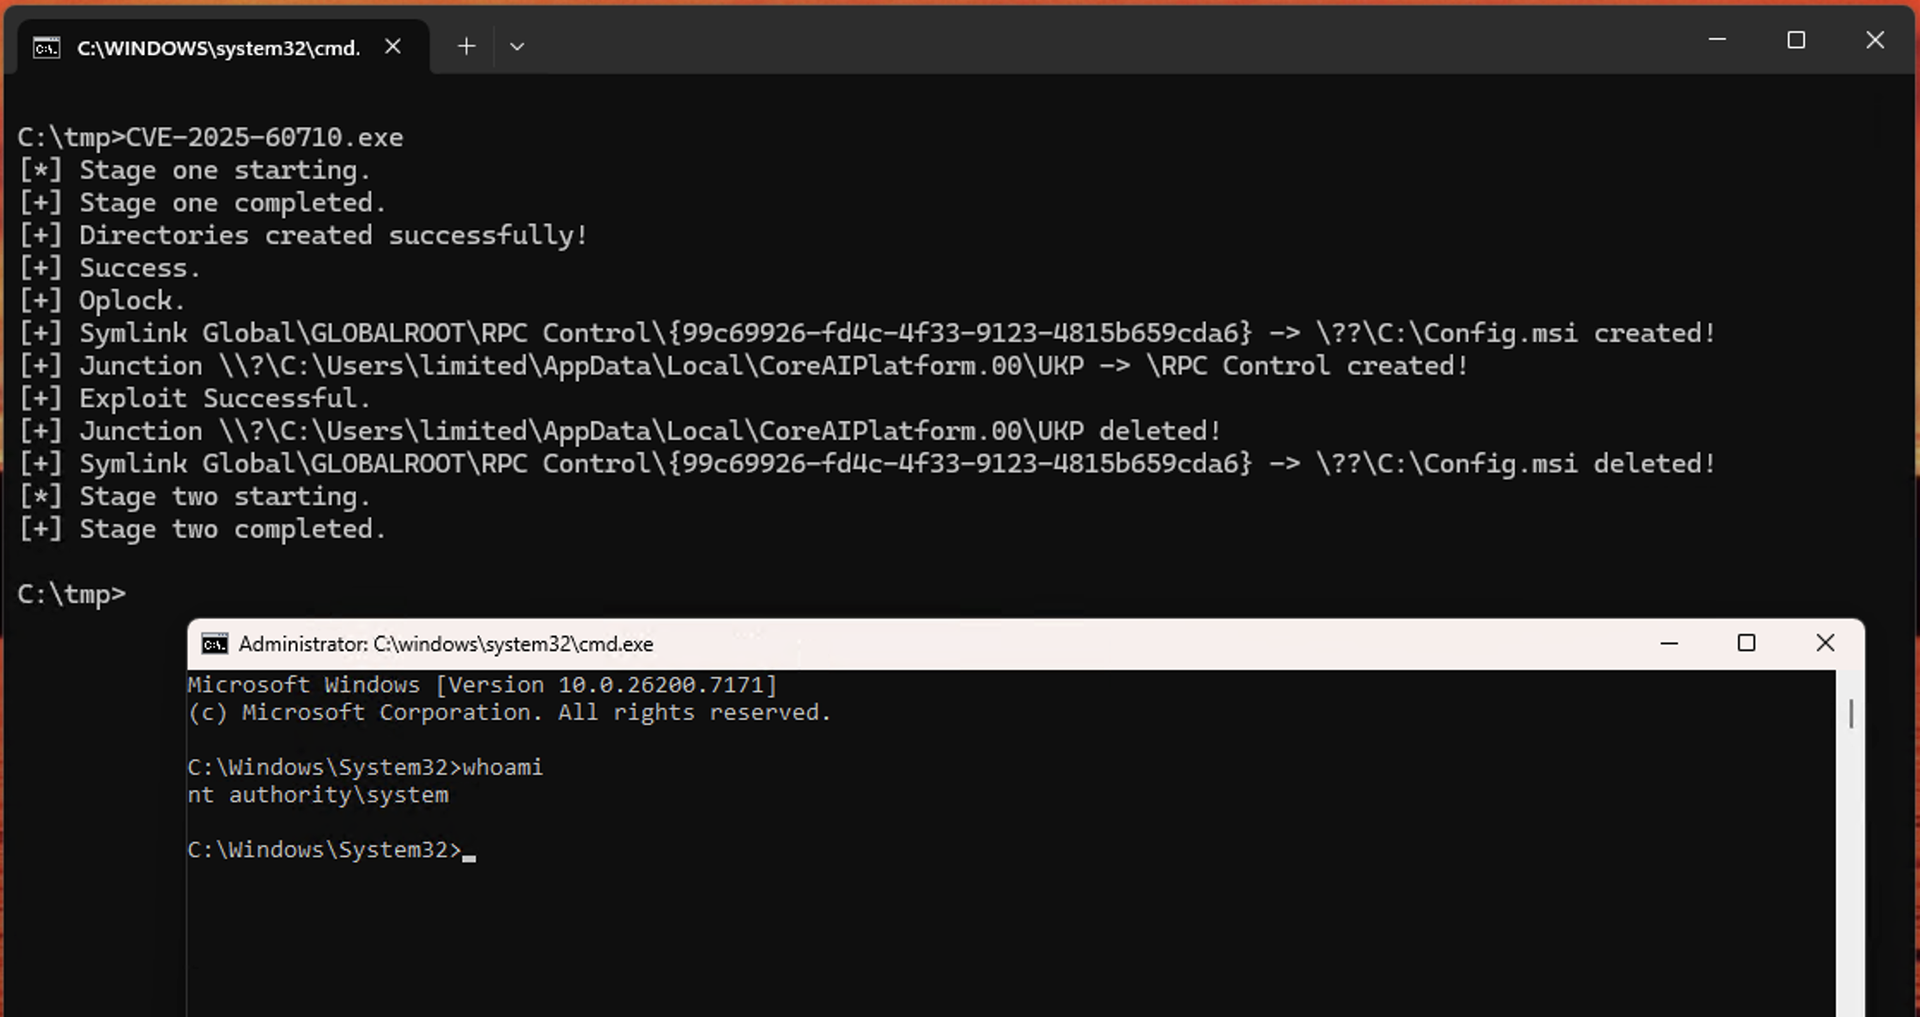
Here we can see that the exploit completes completely, starting with an unprivileged CMD.EXE session, resulting in a newly spawned SYSTEM-privileged CMD.EXE session.
Let’s try against a system with Recommended Harden System Security “Recommended” settings:
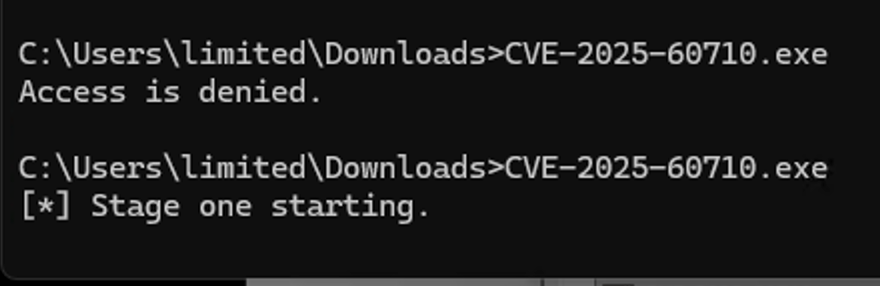
That’s it. We can call it a day. With a sample set of one, we have 100% exploit protection. 😂
Note that the first “Access denied” is an attribute of the exe needing to be allowed via the Windows GUI first after the above hardening. The second invocation is evidence that the exploit is not able to proceed past stage one, due to one of the hardening protections applied.
Joking aside, while the exploit for CVE-2025-60710 was indeed the first exploit we attempted to use against a hardened Windows system, it would be an interesting experiment to continue testing other exploits to get an idea of what percent of exploits in the wild are mitigated by hardening Windows with Harden System Security.
Undoing hardening
If the above list of quirks and caveats makes you too uncomfortable, or if you’ve experienced too many problems to believe that hardening Windows is worth it, we luckily can go back to default Windows behaviors.
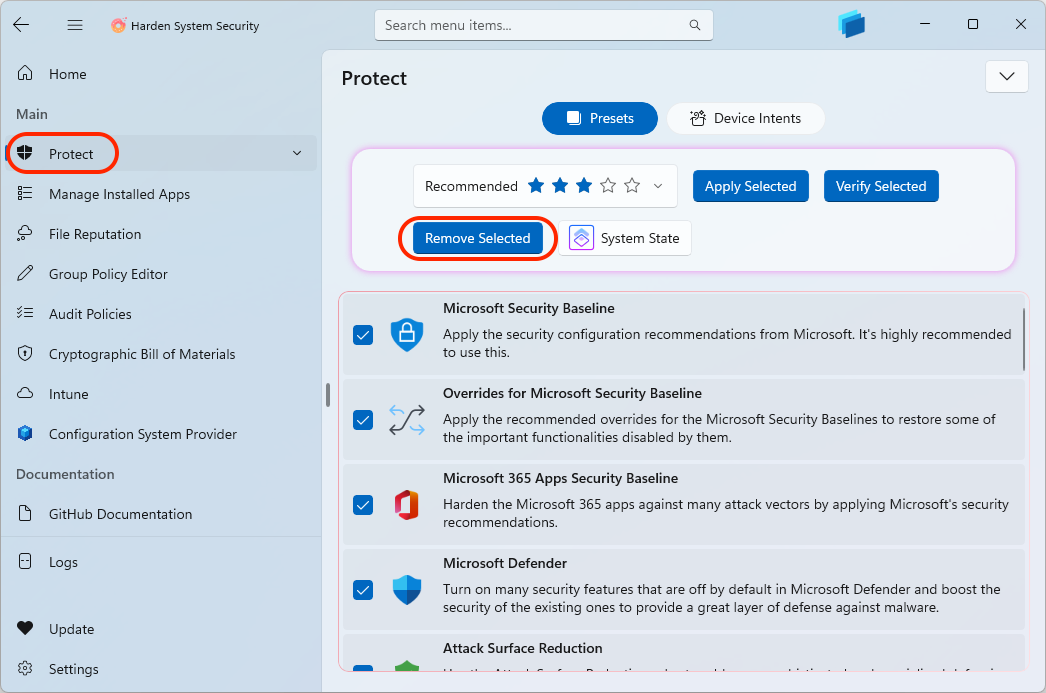
In the Harden System Security app, click Protect on the left side, then System State, and finally click Restore.
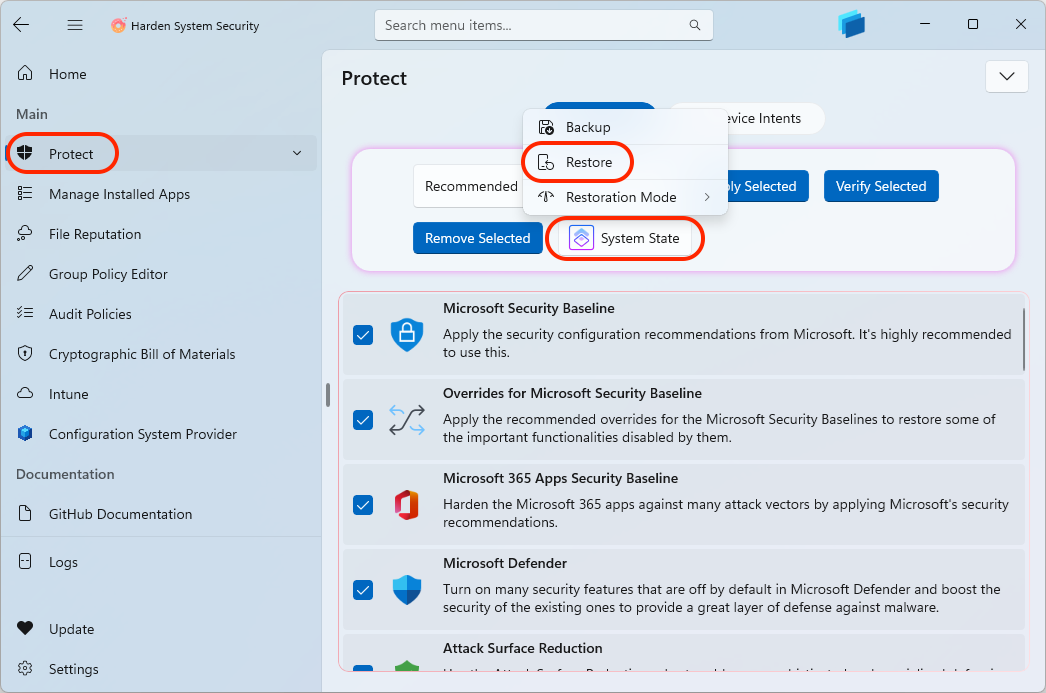
Here you can browse to the JSON file that captured the state of settings before you applied hardening settings.
If you did not perform a backup of the system state, you can simply reset the settings back to default Windows settings by clicking the Remove Selected button.
Conclusion
Harden System Security is a nice once-stop shop for applying hardening settings for Windows systems. Systems that have the recommended hardening settings will be more resistant to exploitation than Windows is out of the box. And for those who care about security, this is an excellent goal.
To completely lock down Windows to ensure that it will not run malicious code will require further steps. A future blog post will discuss how this can be done with the AppControl Manager application, which is a GUI for configuring Windows Application Control.